# Vue3源码笔记

本文记录Vue3源码中的一些细节
# 流程图
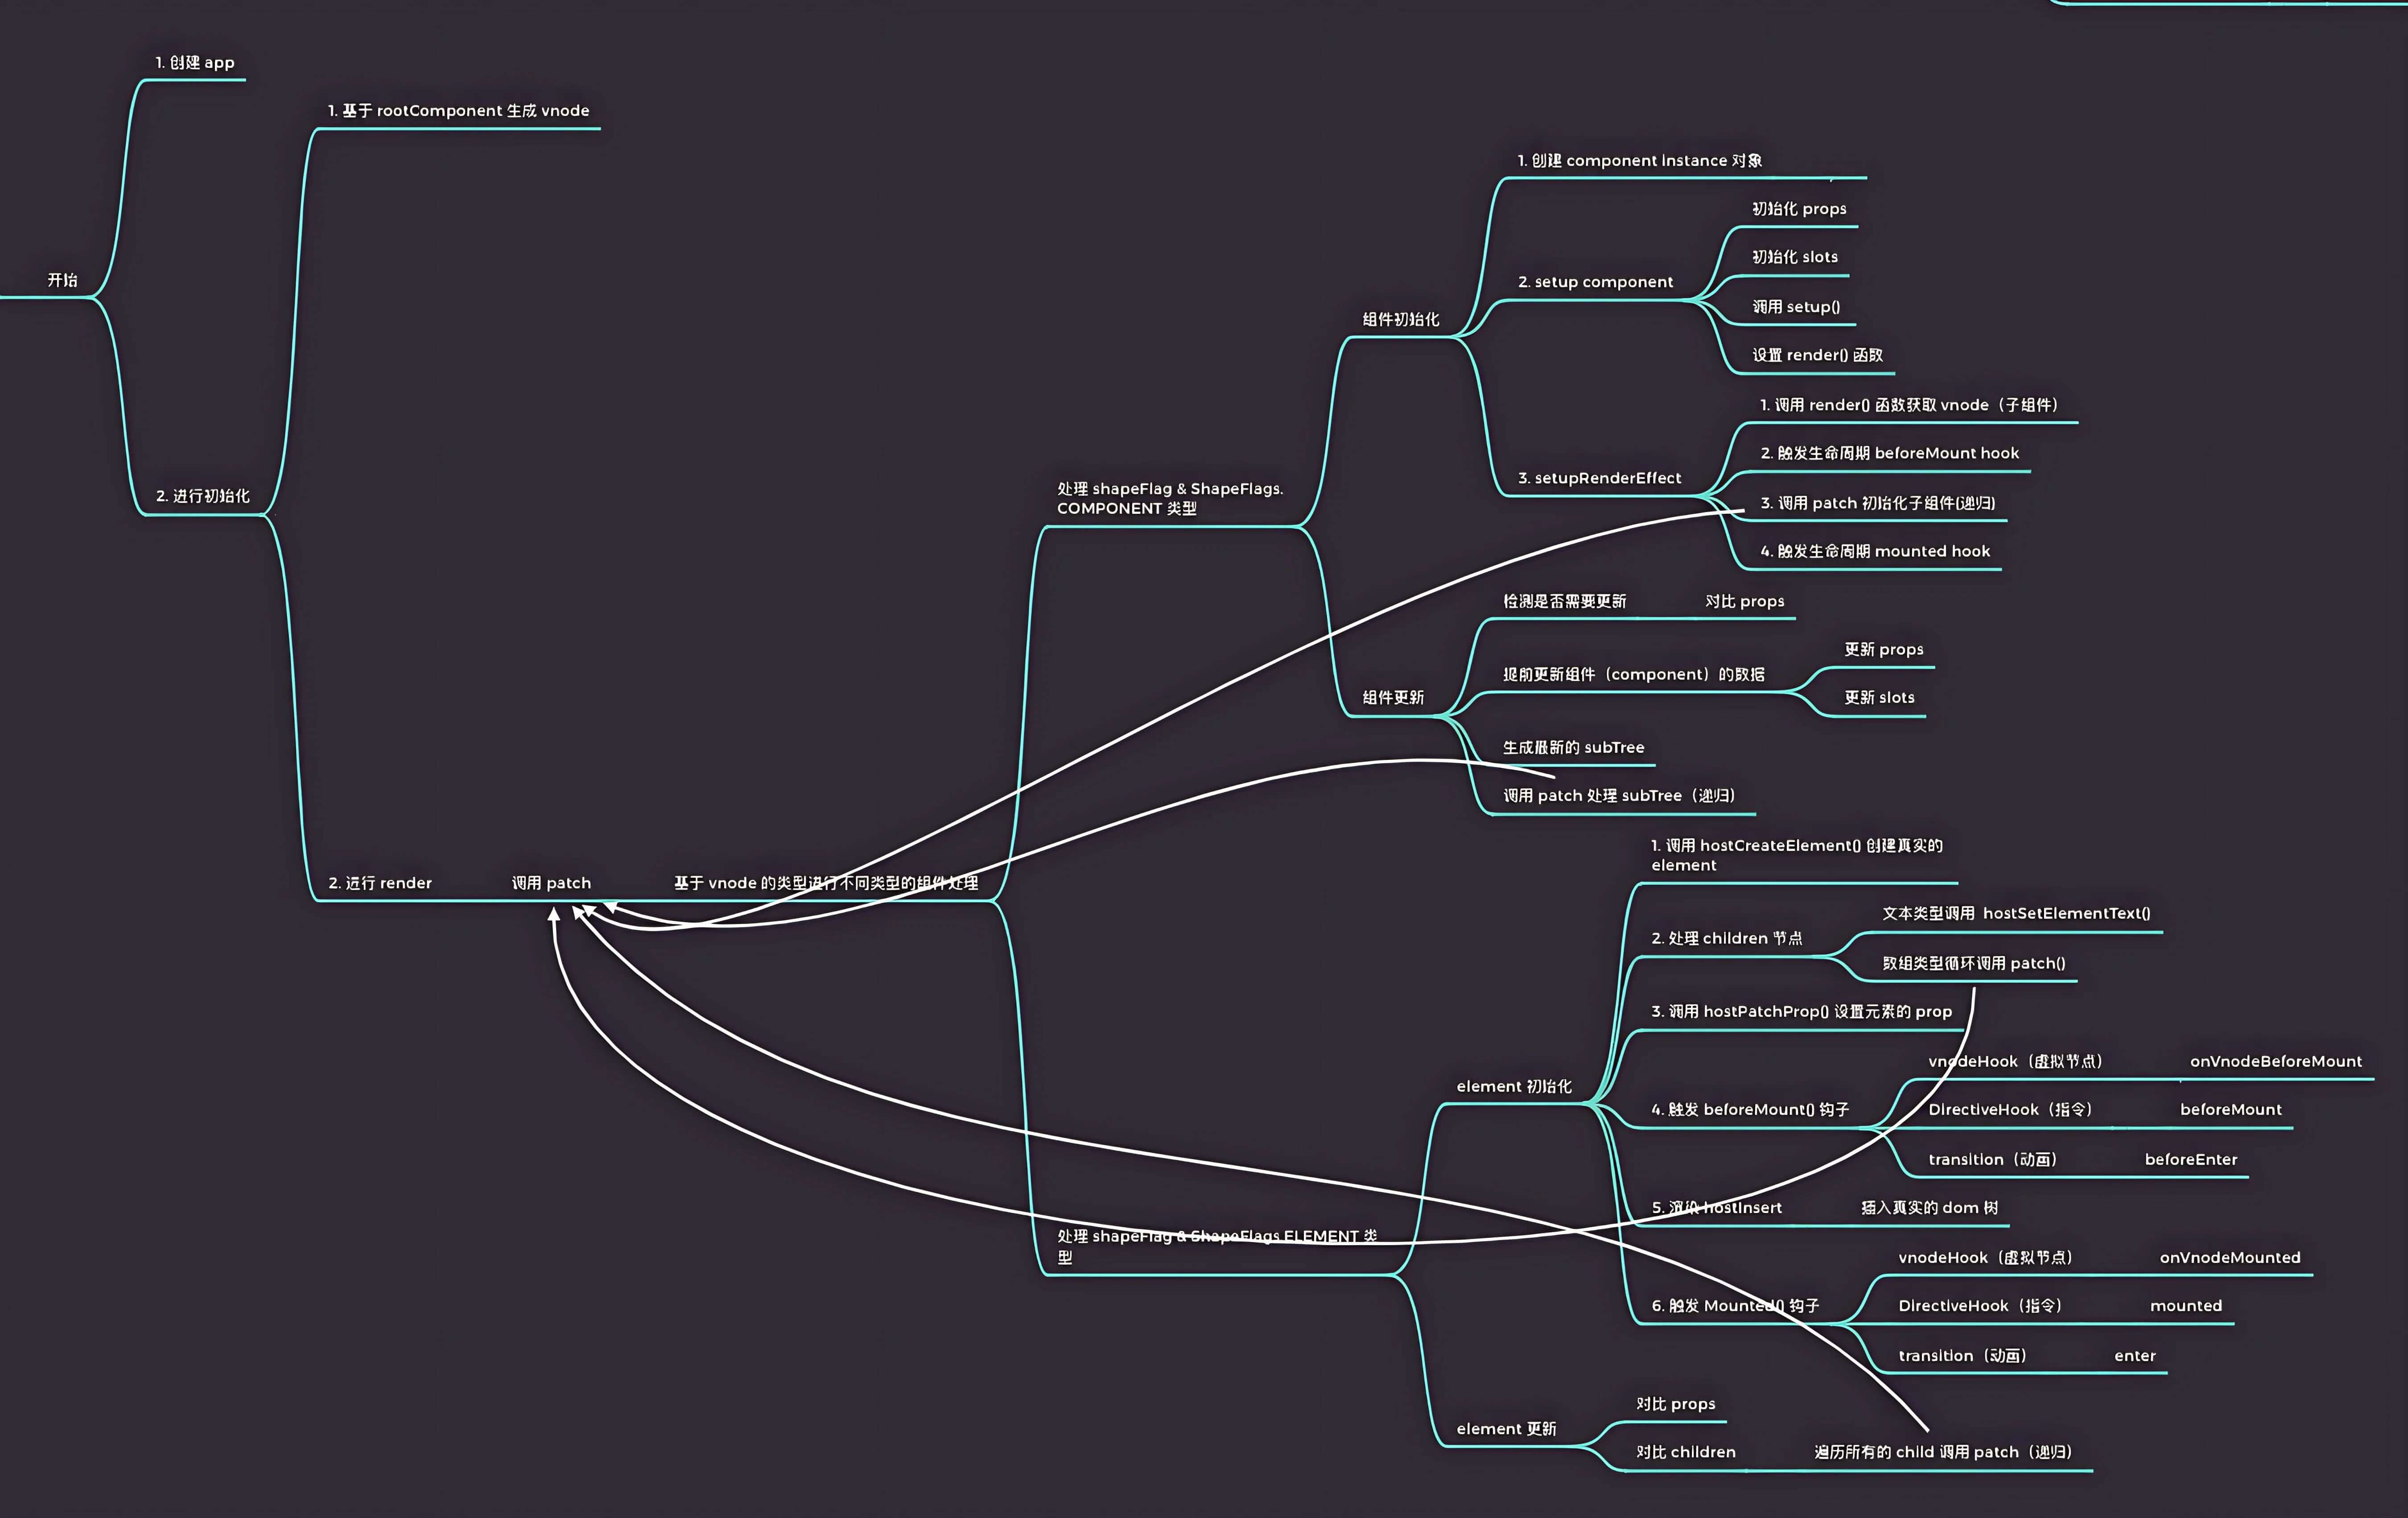
# 初始化阶段-整体流程
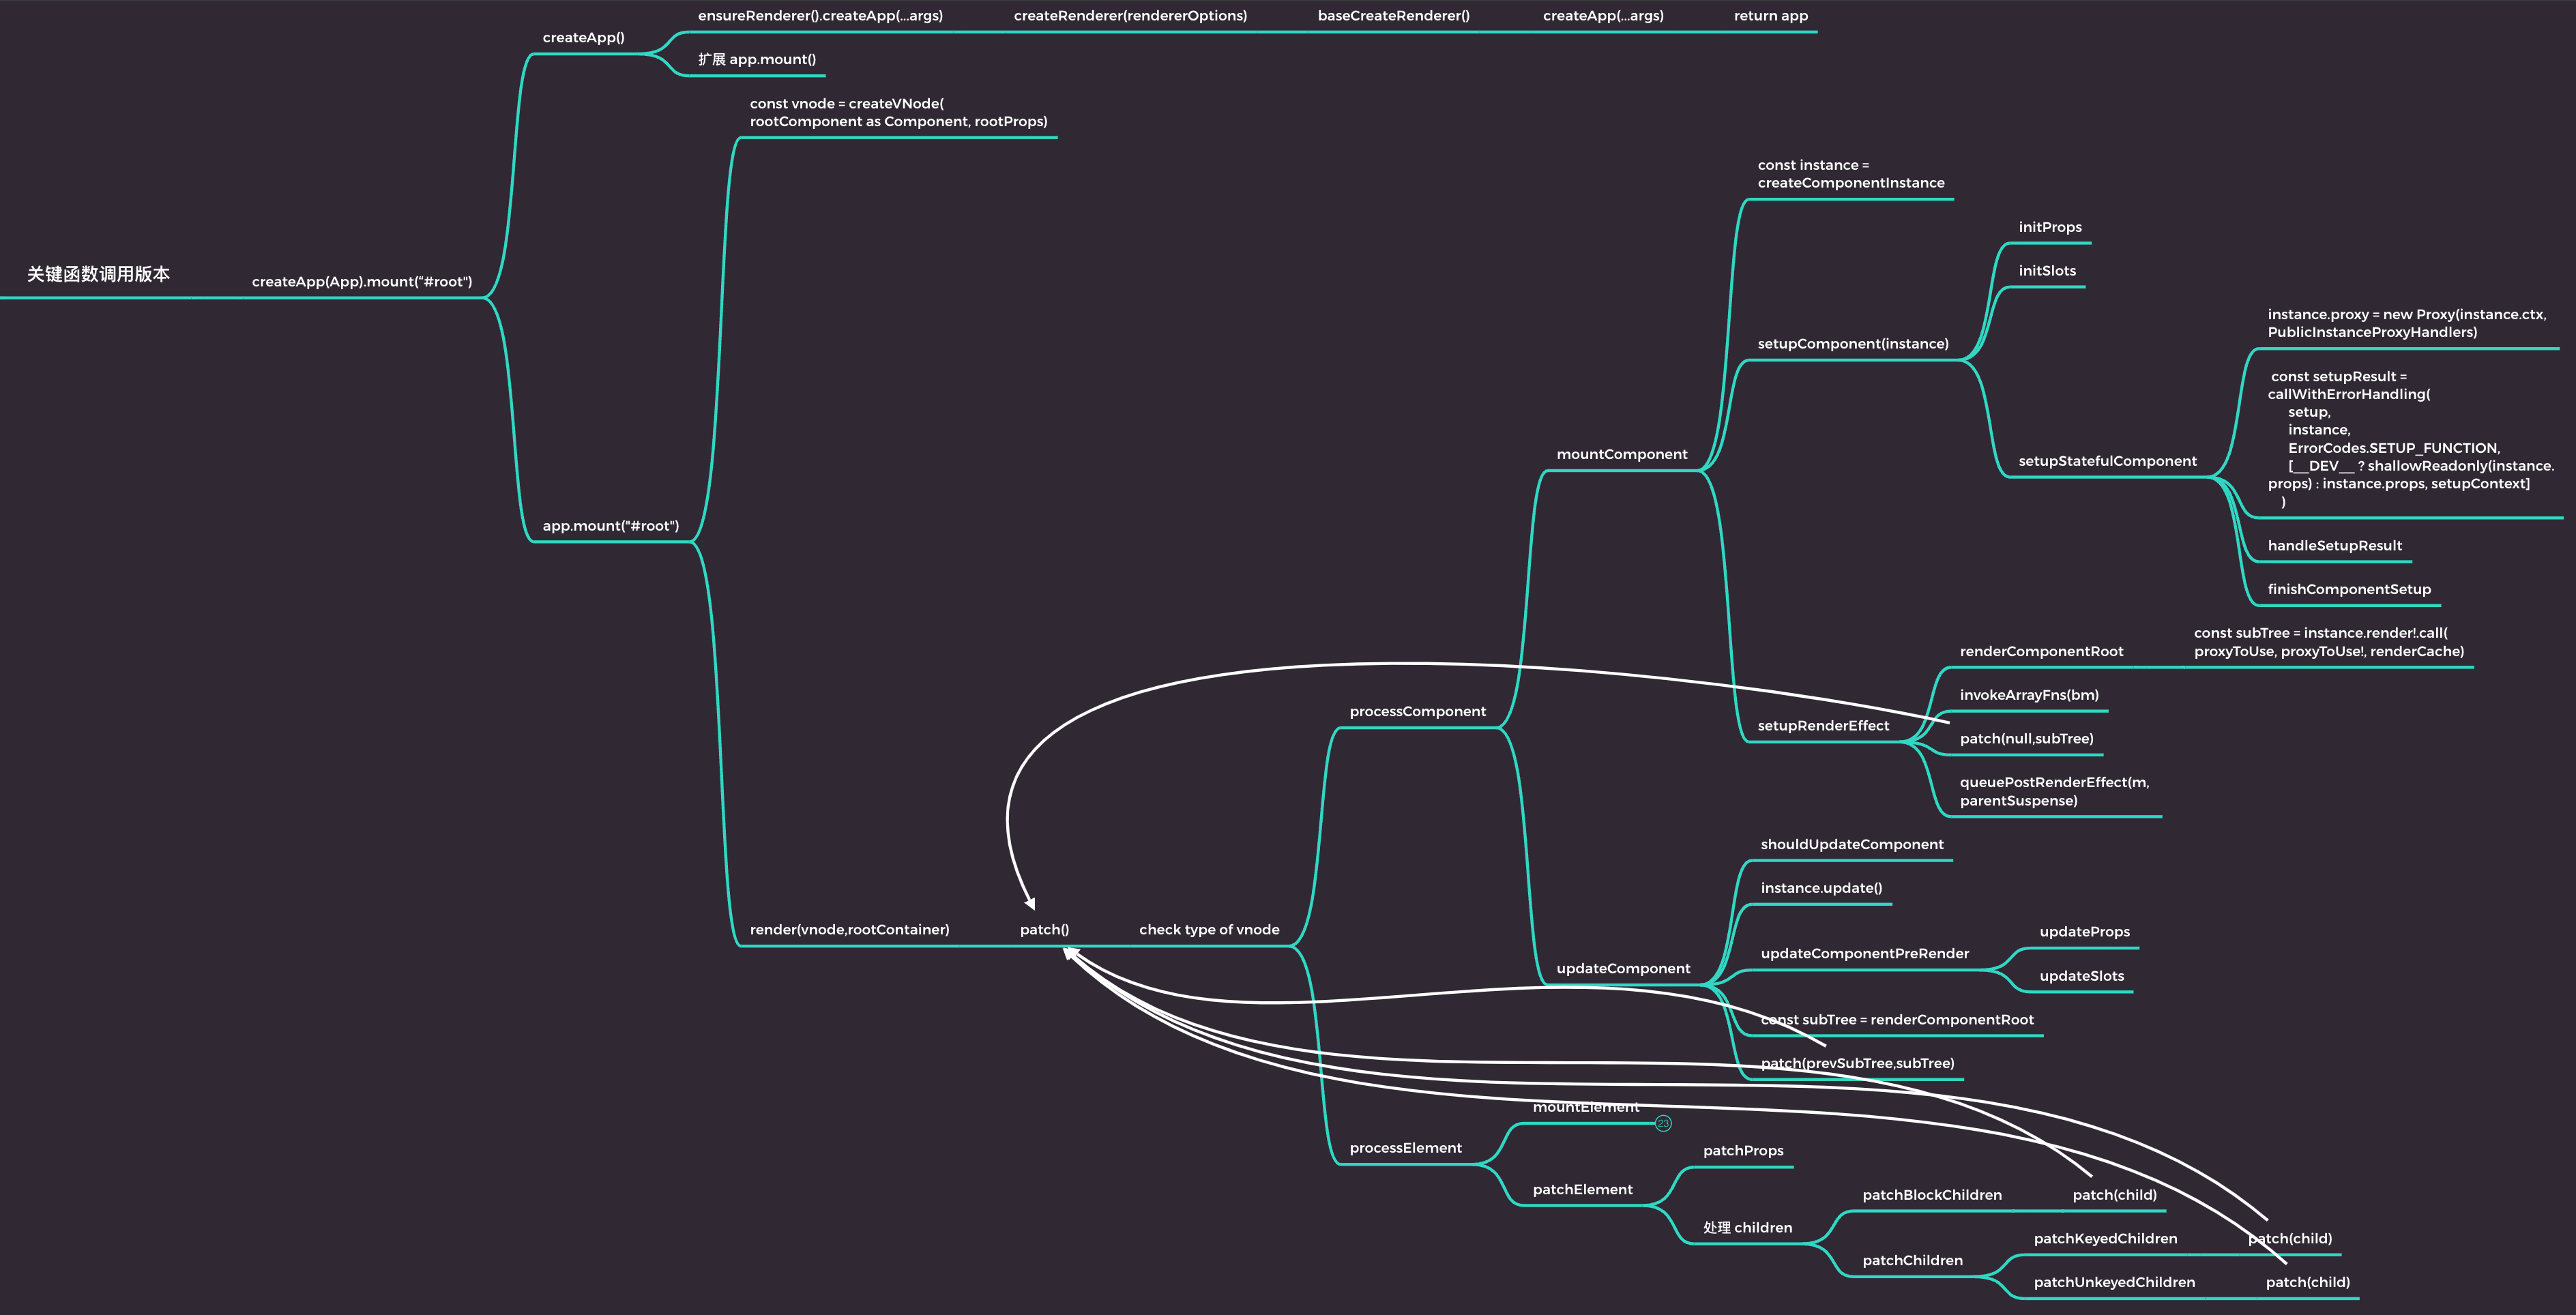
# 初始化阶段-函数调用
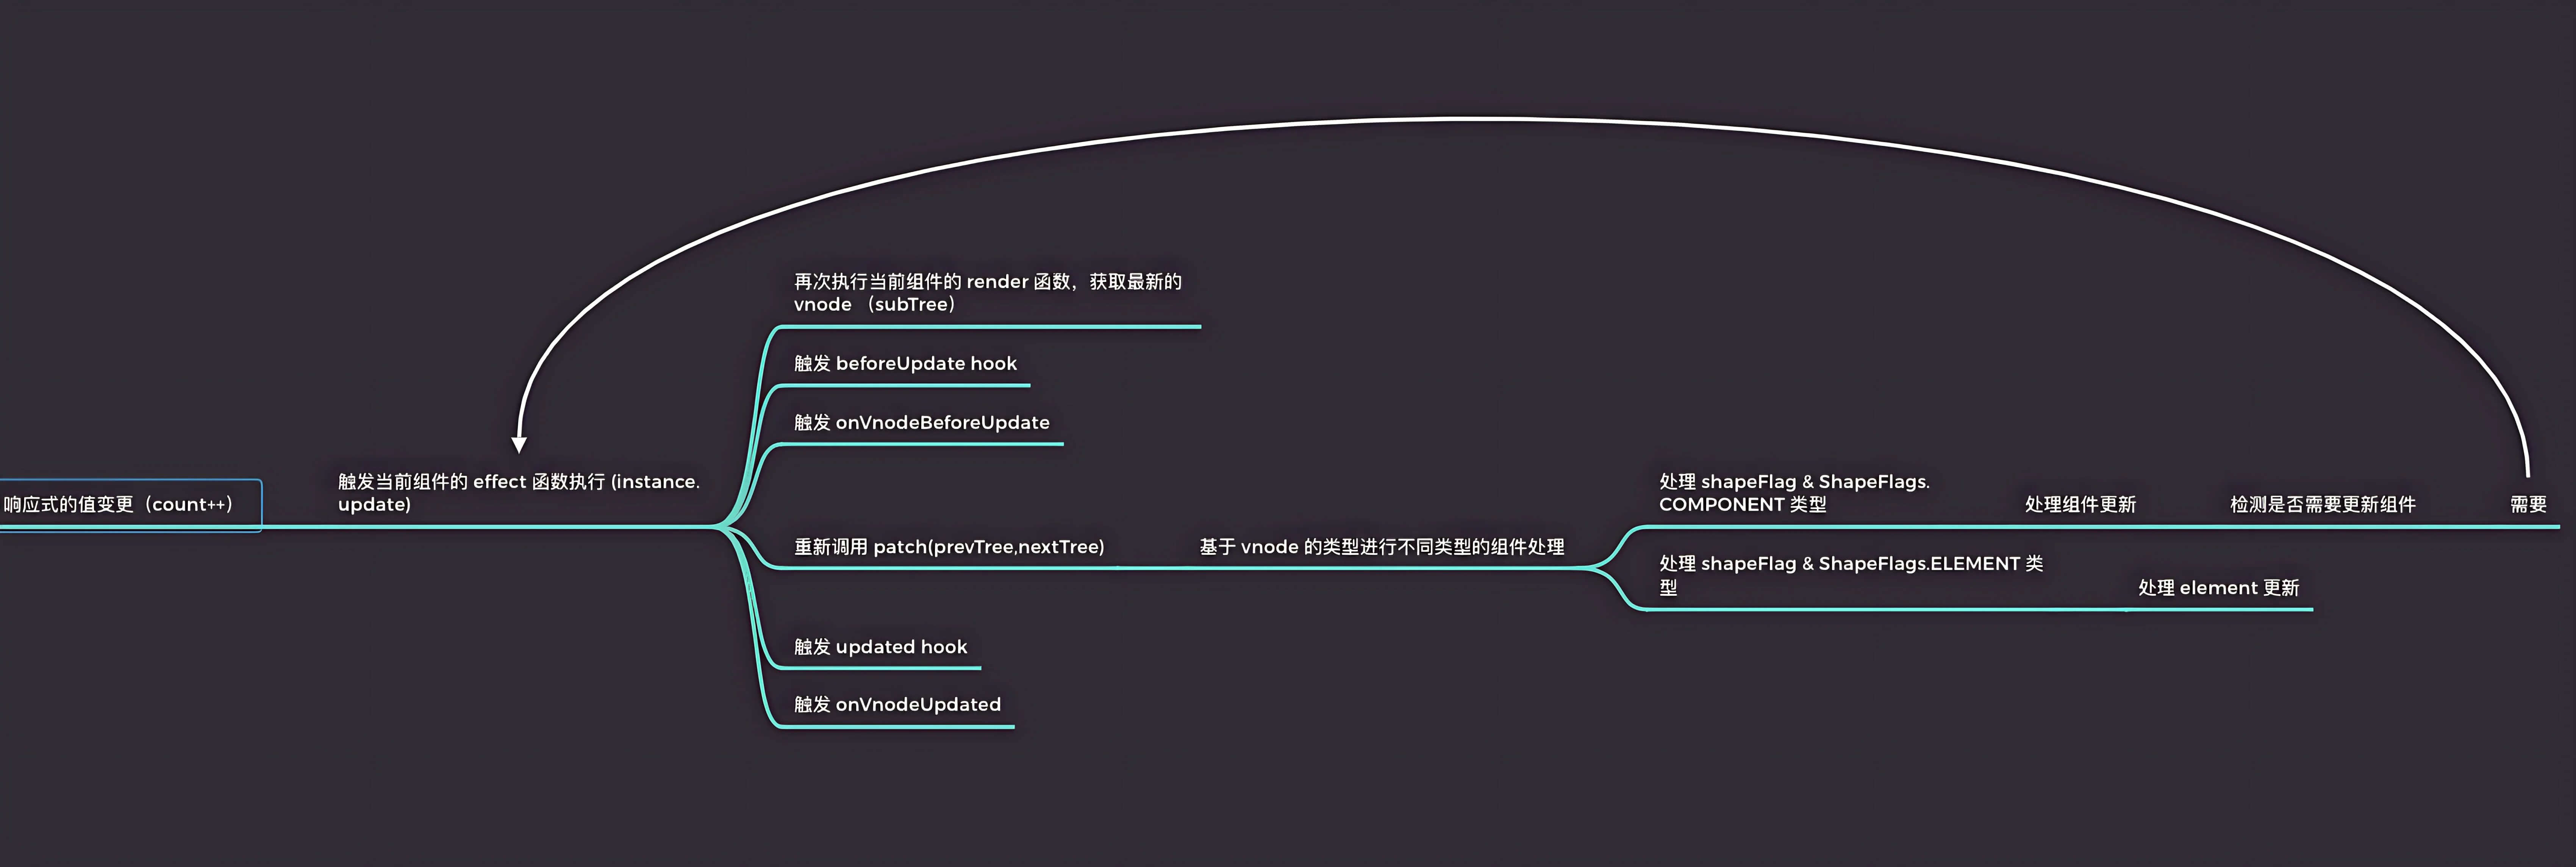
# 更新阶段-整体流程
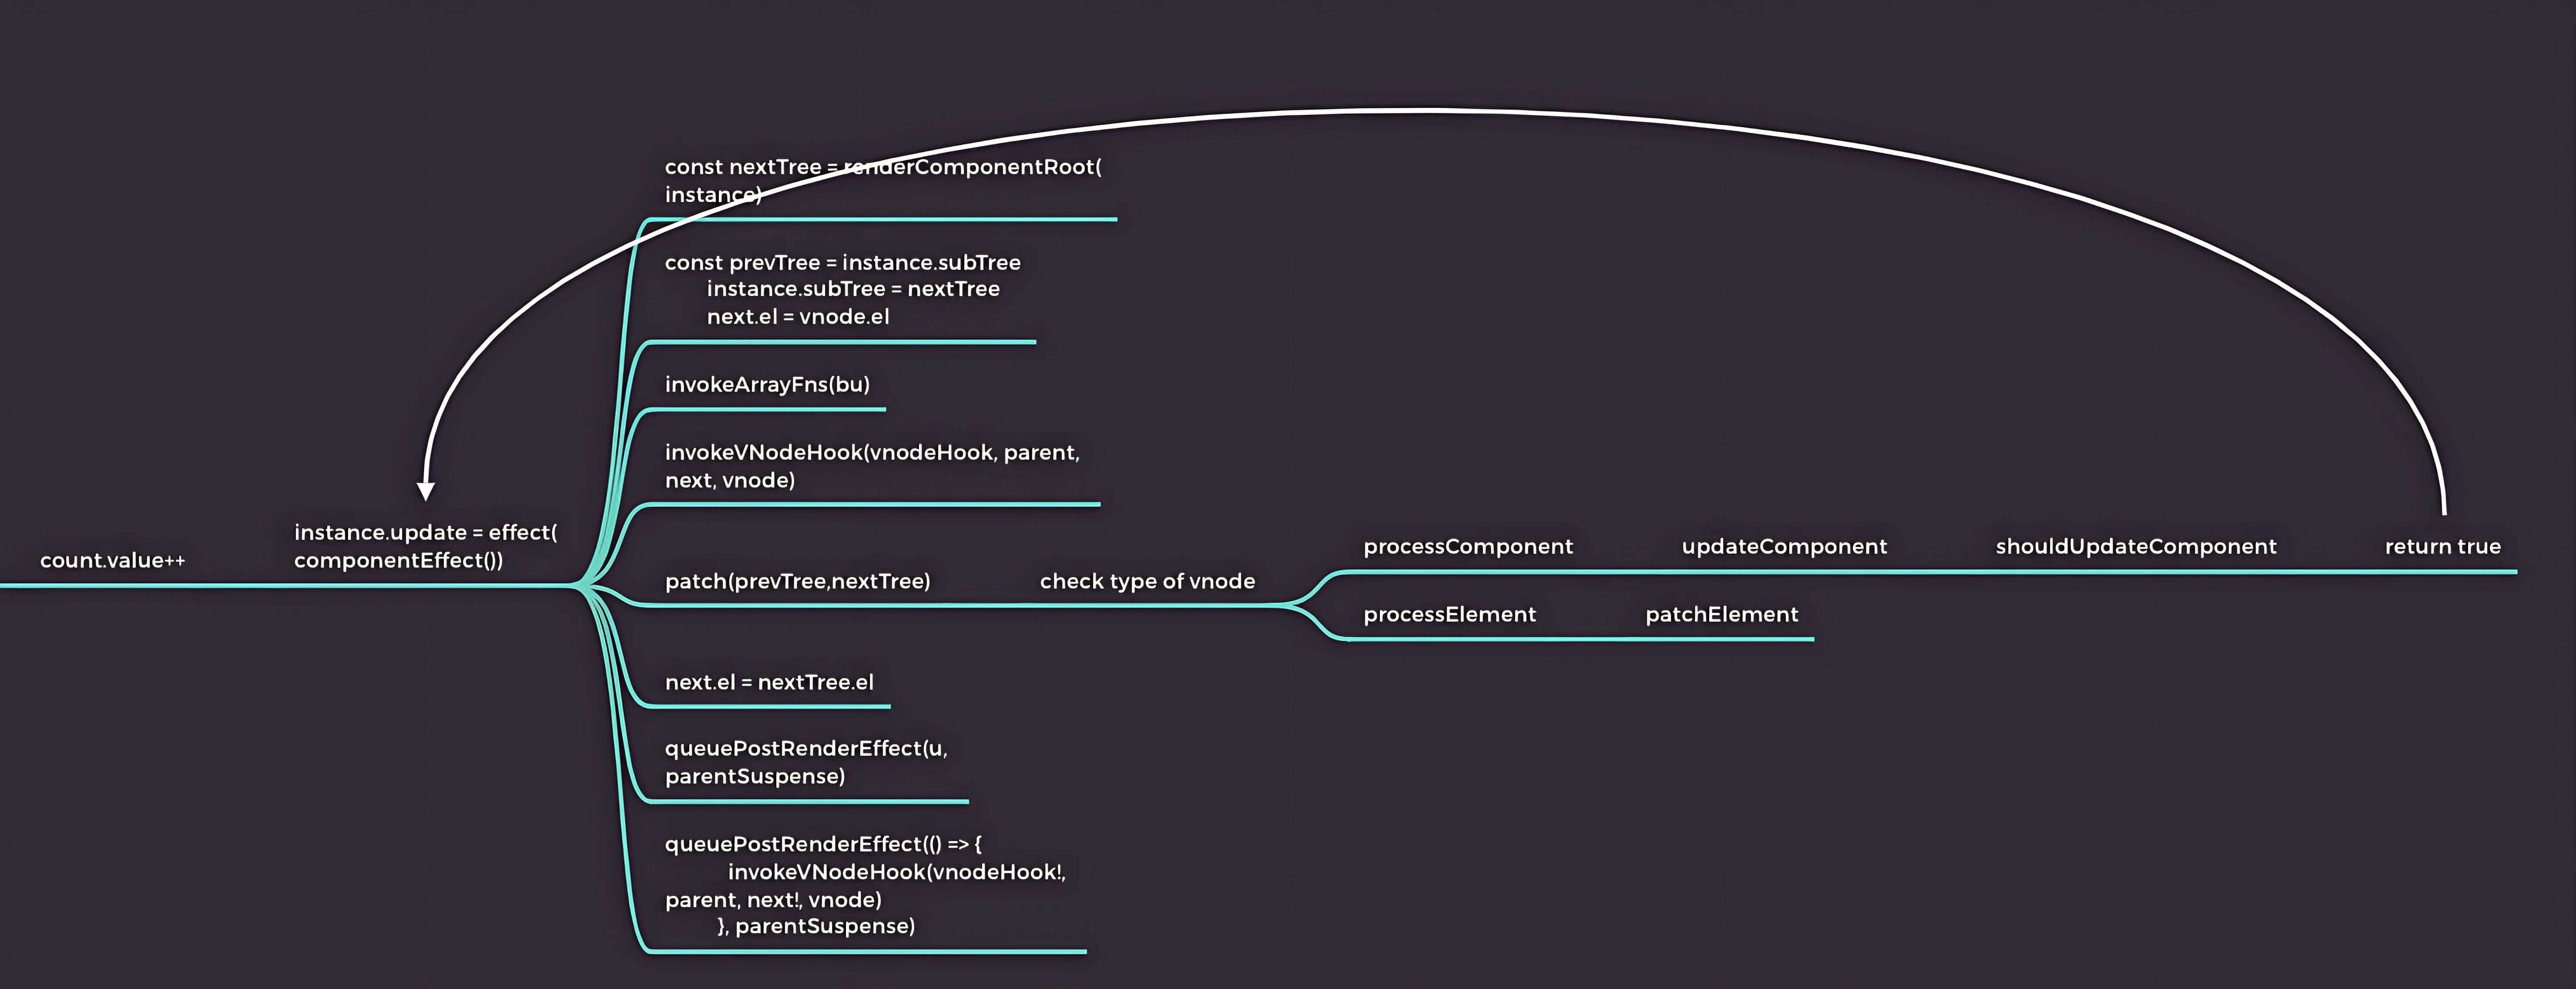
# 更新阶段-函数调用
# 调试单测代码
如果想了解源码某一部分功能, 可以选择调试单测文件的方式来进行(Vue3源码中的__test__中的代码), 本段落来记录如何调试单测文件
# 安装对应依赖
先给项目库安装第三方依赖
# 如果有对应的依赖可以不安装
pnpm i @types/jest jest ts-jest typescript -wD
# 添加配置文件
增加一个jest.config.js的文件
// jest.config.js
module.exports = {
    preset: 'ts-jest',
    testEnvironment: 'node',
    transform: {
      '^.+\\.ts?$': 'ts-jest',
    },
    transformIgnorePatterns: ['./node_modules/'],
    moduleDirectories: ["node_modules", "packages"],
    // 征对monorepo的本地子模块支持
  	// pnpm中子包名为@vue/shared,则按照如下配置
  	moduleNameMapper: {
      "^@vue/shared$": "@vue/shared/src",
      "^@vue/runtime-dom$": "@vue/runtime-dom/src",
      "^@vue/runtime-core$": "@vue/runtime-core/src"
    }
  };
修改tsconfg.json文件内容, 征对monorepo子模块的路径支持(Vue3源码这部分不需要修改)
// tsconfig.json
{
  "paths": {
    "@vue/*": ["packages/*/src"]
  },
  "include": ["packages/*/src", "packages/*/__tests__"]
}
# 两种调试方式
至此, 就可以愉快的调试了, 调试还可以选择使用vscode的自定义配置文件launch.json方式, 也可以选择使用集成的Jest Runner插件来调试
# 使用IDE配置文件
该种方式, 需要手动添加IDE调试配置, 给vscode添加launch.json
{
  // Use IntelliSense to learn about possible attributes.
  // Hover to view descriptions of existing attributes.
  // For more information, visit: https://go.microsoft.com/fwlink/?linkid=830387
  "version": "0.2.0",
  "configurations": [
    {
      "type": "node",
      "name": "vscode-jest-tests",
      "request": "launch",
      "program": "${workspaceFolder}/node_modules/jest/bin/jest",
      "args": ["--runInBand", "--watchAll=false"],
      "cwd": "${workspaceFolder}",
      "console": "integratedTerminal",
      "internalConsoleOptions": "neverOpen",
      "disableOptimisticBPs": true,
      "windows": {
        "program": "${workspaceFolder}/node_modules/jest/bin/jest"
      }
    }
  ]
}
# 使用Jest Runner
该方式不需要自定义配置文件, 只需要安装Vscode插件-Jest Runner (opens new window), 然后在单测文件中, 打上断点后, 点击Run|Debug 按钮即可
# 运行时和编译时
Vue.js支持我们在编写组件的时候定义模板 template, 而 template 是不能直接使用的, 需要 先把它编译生成 render 函数。
如果我们希望在运行时动态编译 template,就得使用 Runtime + Compiler 版本的 Vue.js。
模板编译的过程其实是可以离线运行的。例如, 借助 webpack 的 vue-loader, 就可以在离线构建的时候把.vue 文件中的template 部分编译成 render函数, 并添 加到组件的对象中。
这样在运行时组件对象就已经有 render 函数了, 从而可以使用 Runtime-only 版本的 Vue.js
compile 称之为编译时,
Vue通过compile方法将模版Template转换成render函数runtime 称之为运行时,
Vue通过render函数将Vnode转换成真实的DOM
# 属性的优先级
假如用户代码中, 同时定义了同名的props和data, 或者setup里面的响应式数据, 那么谁的优先级更高?
先看一截源码片段, 里面使用instance.proxy来代理了instance.ctx的内部属性, 例如: setupState、$props、$data等; 读取也就不需要区分属性定义在哪个类别里面, 统一从instance.proxy里面去读; 这一点其实类似于Vue2里面对data的代理
// packages/runtime-core/src/component.ts

// proxy 对象其实是代理了 instance.ctx 对象
// 我们在使用的时候需要使用 instance.proxy 对象
// 因为 instance.ctx 在 prod 和 dev 坏境下是不同的
instance.proxy = markRaw(new Proxy(instance.ctx, PublicInstanceProxyHandlers))
源码-PublicInstanceProxyHandlers (opens new window)
export const PublicInstanceProxyHandlers: ProxyHandler<any> = {
  get({ _: instance }: ComponentRenderContext, key: string) {
    const { ctx, setupState, data, props, accessCache, type, appContext } =
      instance

    let normalizedProps
    if (key[0] !== '$') {
      const n = accessCache![key]
      if (n !== undefined) {
        switch (n) {
          case AccessTypes.SETUP:
            return setupState[key]
          case AccessTypes.DATA:
            return data[key]
          case AccessTypes.CONTEXT:
            return ctx[key]
          case AccessTypes.PROPS:
            return props![key]
          // default: just fallthrough
        }
      } else if (hasSetupBinding(setupState, key)) {
        accessCache![key] = AccessTypes.SETUP
        return setupState[key]
      } else if (data !== EMPTY_OBJ && hasOwn(data, key)) {
        accessCache![key] = AccessTypes.DATA
        return data[key]
      } else if (
        // only cache other properties when instance has declared (thus stable)
        // props
        (normalizedProps = instance.propsOptions[0]) &&
        hasOwn(normalizedProps, key)
      ) {
        accessCache![key] = AccessTypes.PROPS
        return props![key]
      } else if (ctx !== EMPTY_OBJ && hasOwn(ctx, key)) {
        accessCache![key] = AccessTypes.CONTEXT
        return ctx[key]
      } else if (!__FEATURE_OPTIONS_API__ || shouldCacheAccess) {
        accessCache![key] = AccessTypes.OTHER
      }
    }

    const publicGetter = publicPropertiesMap[key]
    let cssModule, globalProperties
    // public $xxx properties
    if (publicGetter) {
      if (key === '$attrs') {
        track(instance, TrackOpTypes.GET, key)
        __DEV__ && markAttrsAccessed()
      }
      return publicGetter(instance)
    } else if (
      // css module (injected by vue-loader)
      (cssModule = type.__cssModules) &&
      (cssModule = cssModule[key])
    ) {
      return cssModule
    } else if (ctx !== EMPTY_OBJ && hasOwn(ctx, key)) {
      // user may set custom properties to `this` that start with `$`
      accessCache![key] = AccessTypes.CONTEXT
      return ctx[key]
    } else if (
      // global properties
      ((globalProperties = appContext.config.globalProperties),
      hasOwn(globalProperties, key))
    ) {
        return globalProperties[key]
    }
  },

  set(
    { _: instance }: ComponentRenderContext,
    key: string,
    value: any
  ): boolean {
    const { data, setupState, ctx } = instance
    if (hasSetupBinding(setupState, key)) {
      setupState[key] = value
      return true
    } else if (
      __DEV__ &&
      setupState.__isScriptSetup &&
      hasOwn(setupState, key)
    ) {
      warn(`Cannot mutate <script setup> binding "${key}" from Options API.`)
      return false
    } else if (data !== EMPTY_OBJ && hasOwn(data, key)) {
      data[key] = value
      return true
    } else if (hasOwn(instance.props, key)) {
      __DEV__ && warn(`Attempting to mutate prop "${key}". Props are readonly.`)
      return false
    }
    if (key[0] === '$' && key.slice(1) in instance) {
      __DEV__ &&
        warn(
          `Attempting to mutate public property "${key}". ` +
            `Properties starting with $ are reserved and readonly.`
        )
      return false
    } else {
      if (__DEV__ && key in instance.appContext.config.globalProperties) {
        Object.defineProperty(ctx, key, {
          enumerable: true,
          configurable: true,
          value
        })
      } else {
        ctx[key] = value
      }
    }
    return true
  },

  has(
    {
      _: { data, setupState, accessCache, ctx, appContext, propsOptions }
    }: ComponentRenderContext,
    key: string
  ) {
    let normalizedProps
    return (
      !!accessCache![key] ||
      (data !== EMPTY_OBJ && hasOwn(data, key)) ||
      hasSetupBinding(setupState, key) ||
      ((normalizedProps = propsOptions[0]) && hasOwn(normalizedProps, key)) ||
      hasOwn(ctx, key) ||
      hasOwn(publicPropertiesMap, key) ||
      hasOwn(appContext.config.globalProperties, key)
    )
  },

  defineProperty(
    target: ComponentRenderContext,
    key: string,
    descriptor: PropertyDescriptor
  ) {
    if (descriptor.get != null) {
      // invalidate key cache of a getter based property #5417
      target._.accessCache![key] = 0
    } else if (hasOwn(descriptor, 'value')) {
      this.set!(target, key, descriptor.value, null)
    }
    return Reflect.defineProperty(target, key, descriptor)
  }
}
# 访问的优先级依次如下
从源码中可以很清楚的看出, 访问属性的优先级如下:
- setupState
- data
- props
- ctx
- $开头的内部属性
- cssmodules属性
- globalProperties
# 修改的优先级依次如下
源码中, 修改属性的优先级如下:
- setupState
- data
- props(会告警)
- globalProperties
- ctx
# 属性检查的优先级依次如下
源码中, 属性查询( 使用in关键词 )的优先级如下:
- accessCache
- data
- setupState
- prop
- ctx
- publicPropertiesMap
- globalProperties
export default {
  created () {
    // 在源码的PublicInstanceProxyHandlers, 代理了has方法
    // 因此使用`in`关键词就会触发代理
    console.log('msg' in this)
  }
}
# callWithErrorHandling
Vue3中有一个函数callWithErrorHandling, 用来调用其他函数并包含错误处理, 这样设计的目的是
由
Vue内部统一try...catch处理用户代码运行可能出现的错误。另一方面这些错误也可以交由用户统一注册的errorHandler进行处理,比如上报给监控系统
export function callWithErrorHandling(fn, instance, type, args = []) {
  let res
  try {
    res = args ? fn(...args) : fn()
  } catch (err) {
    handleError(err, instance, type)
  }
  return res
}
# createSetupContext
主要用于创建实例里面的上下文instance.setupContext对象, 里面主要包含
- attrs
- slots
- emit
- expose
因此setup函数的参数依次就是instance.props, instance.setupContext
//
export function createSetupContext(
  instance: ComponentInternalInstance
): SetupContext {
  let attrs: Data
  if (__DEV__) {
    // We use getters in dev in case libs like test-utils overwrite instance
    // properties (overwrites should not be done in prod)
    return Object.freeze({
      get attrs() {
        return attrs || (attrs = createAttrsProxy(instance))
      },
      get slots() {
        return shallowReadonly(instance.slots)
      },
      get emit() {
        return (event: string, ...args: any[]) => instance.emit(event, ...args)
      },
      expose
    })
  } else {
    return {
      get attrs() {
        return attrs || (attrs = createAttrsProxy(instance))
      },
      slots: instance.slots,
      emit: instance.emit,
      expose
    }
  }
}
# isPromise
export const isObject = (val: unknown): val is Record<any, any> =>
  val !== null && typeof val === 'object'

export const isFunction = (val: unknown): val is Function =>
  typeof val === 'function'

export const isPromise = <T = any>(val: unknown): val is Promise<T> => {
  return isObject(val) && isFunction(val.then) && isFunction(val.catch)
}
# setupResult
Vue3中通过callWithErrorHandling执行了setup函数, 征对返回值 setupResult 的类型做不同的处理:
# 返回Promise
unsetCurrentInstance是一个 Vue 内部的函数,用于清除当前组件实例的上下文。它会将当前组件实例从全局的 currentInstance 中移除,以确保在下一次组件实例化时,currentInstance 是正确的。
异步操作可能导致上下文错乱:在组件的 setup 函数中,你可能会执行一些异步操作,例如发送网络请求、处理定时器等。这些异步操作可能需要一些时间才能完成,并且可能导致组件的重新渲染。如果在异步操作完成之前,当前组件实例的上下文仍然存在,那么可能会出现上下文错乱的情况,导致渲染和响应出现不正确的结果。
清除上下文保持一致性:通过清除当前组件实例的上下文,可以确保在异步操作完成后,组件实例化时的上下文是一致的。这样可以避免潜在的问题,并确保组件的渲染和响应行为是可预测的和正确的。
通过在异步操作的 Promise 解析完成后,清除当前组件实例的上下文,可以保证组件在异步操作完成后的下一次渲染和响应行为的一致性和正确性。
需要注意的是,这个处理是在 Vue 3 的内部实现中进行的,开发者不需要手动处理和关心它。这个机制是为了保证组件的稳定和可靠性,并提供一致的行为
通过以上处理,Vue 3 在 setup 函数返回值为 Promise 的情况下,保证在 Promise 解析完成后,清除当前组件实例的上下文。这是为了确保组件在异步操作完成后,能够正确地进行下一次的渲染和响应。
// packages/runtime-core/src/component.ts
if (isPromise(setupResult)) {
  setupResult.then(unsetCurrentInstance, unsetCurrentInstance)
}

export const unsetCurrentInstance = () => {
  currentInstance && currentInstance.scope.off()
  currentInstance = null
}
# 返回函数
如果setupResult是一个函数, 就把结果作为render函数
// packages/runtime-core/src/component.ts
if (isFunction(setupResult)) {
    // setup returned an inline render function
    if (__SSR__ && (instance.type as ComponentOptions).__ssrInlineRender) {
      // when the function's name is `ssrRender` (compiled by SFC inline mode),
      // set it as ssrRender instead.
      instance.ssrRender = setupResult
    } else {
      instance.render = setupResult as InternalRenderFunction
    }
 }
# 返回对象
如果setupResult是一个对象, 就把结果包装为响应式对象, 以供template以及其他需要响应式对象的地方使用
// packages/runtime-core/src/component.ts
if (isObject(setupResult)) {
    // setup returned bindings.
    // assuming a render function compiled from template is present.
    instance.setupState = proxyRefs(setupResult)
}

// packages/reactivity/src/ref.ts
export function proxyRefs<T extends object>(
  objectWithRefs: T
): ShallowUnwrapRef<T> {
  return isReactive(objectWithRefs)
    ? objectWithRefs
    : new Proxy(objectWithRefs, shallowUnwrapHandlers)
}
import { ref, reactive } from 'vue';

const MyComponent = {
  setup() {
    // 定义响应式数据
    const count = ref(0);
    const state = reactive({
      message: 'Hello, Vue!'
    });

    // 定义方法
    function increment() {
      count.value++;
    }

    // 返回对象
    return {
      count,
      state,
      increment
    };
  }
};
在上述示例中,setup 函数返回了一个包含 count、state 和 increment 的对象。这些属性和方法可以在组件的模板中使用,例如 {{ count }} 或 @click="increment"
# currentInstance
在 Vue 中,currentInstance 全局变量只会持有一个活动的组件实例。每次组件的生命周期钩子函数被调用时,currentInstance 都会被设置为当前活动的组件实例。
由于 Vue 是一个单线程的框架,在任何给定的时刻,只有一个组件实例处于活动状态。当组件的生命周期钩子函数被触发时,currentInstance 会被设置为该组件的实例,以便在钩子函数中可以访问到当前的组件实例。
这种设计是为了确保在组件生命周期的不同阶段,能够准确地识别和访问到当前的组件实例。currentInstance 可以在组件的 setup 函数、渲染函数、自定义指令等场景中使用,以获取当前活动的组件实例。
需要注意的是,在不同的时刻和上下文中,currentInstance 可能会被不同的组件实例赋值。这是由 Vue 内部的组件实例化和销毁机制决定的。开发者不需要手动操作 currentInstance,而是依赖 Vue 内部的机制来确保其正确性。
在 Vue 应用中,页面通常由一个或多个根组件组成。每个根组件可以包含其他子组件,并形成组件树。当一个组件实例处于活动状态时,currentInstance 会被设置为该组件的实例。
currentInstance 可以在任何组件层级上被使用,而不仅限于页面级别。它是一个全局变量,用于跟踪当前活动的组件实例,并在需要访问组件实例的场景中提供便利。
例如,在组件的 setup 函数中,你可以通过 currentInstance 来访问当前组件实例,以获取组件的属性、方法或上下文信息。在自定义指令的钩子函数中,你也可以使用 currentInstance 来访问当前指令所绑定的组件实例。
总结来说,currentInstance 是一个指向当前活动的组件实例的全局变量,用于访问当前组件的上下文和属性。它并不是以页面为单位的页面组件,而是表示当前活动的任意一个组件实例。
源码中, 在setup调用之前, 将这个全局变量设置为当前的实例, 调用完后, 又设置会默认值null, 就一定能保证在每个组件的setup中拿到自己的实例
// packages/runtime-core/src/component.ts
function setupStatefulComponent(
  instance: ComponentInternalInstance,
  isSSR: boolean
) {
  const Component = instance.type as ComponentOptions
  // ....不重要的部分已省略
  // 2. call setup()
  const { setup } = Component
  if (setup) {
    const setupContext = (instance.setupContext =
      setup.length > 1 ? createSetupContext(instance) : null)

    // 设置当前 currentInstance 的值
    // 必须要在调用 setup 之前
    setCurrentInstance(instance)
    pauseTracking()
    // 调用setup的参数依次为instance.props和setupContext
    // 这里还能看到, 在生产环境props是可读写的, 只有开发环境才是只读属性
    const setupResult = callWithErrorHandling(
      setup,
      instance,
      ErrorCodes.SETUP_FUNCTION,
      [__DEV__ ? shallowReadonly(instance.props) : instance.props, setupContext]
    )
    resetTracking()
    // 设置回默认值
    unsetCurrentInstance()
  } else {
    finishComponentSetup(instance, isSSR)
  }
}
在setup可以通过接口getCurrentInstance获取当前活动实例
import { getCurrentInstance } from 'vue'

const instance = getCurrentInstance()
# proxyRefs
proxyRefs 用于将带有特殊响应式引用类型的对象转换为带有响应式引用的代理对象, 把 setupResult 对象做一层代理, 方便用户直接访问 ref 类型的值
比如, setupResult 里面有个 count 是个 ref 类型的对象,用户使用的时候就可以直接使用 count 了,而不需要在 count.value, 这里也就是官网里面说到的自动结构 Ref 类型
结合上文代码instance.proxy = new Proxy(instance.ctx, PublicInstanceProxyHandlers), instance.ctx中的属性已经被instance.prxoy代理, 当进入Proxy的陷阱函数后, 再次取setupState中的属性时, 又会被proxyRefs中的拦截函数拦截, 然后就完成解构逻辑
// packages/reactivity/src/ref.ts
export function proxyRefs<T extends object>(
  objectWithRefs: T
): ShallowUnwrapRef<T> {
  return isReactive(objectWithRefs)
    ? objectWithRefs
    : new Proxy(objectWithRefs, shallowUnwrapHandlers)
}

export function unref<T>(ref: T | Ref<T>): T {
  return isRef(ref) ? (ref.value as any) : ref
}

const shallowUnwrapHandlers: ProxyHandler<any> = {
  get: (target, key, receiver) => unref(Reflect.get(target, key, receiver)),
  set: (target, key, value, receiver) => {
    const oldValue = target[key]
    if (isRef(oldValue) && !isRef(value)) {
      oldValue.value = value
      return true
    } else {
      return Reflect.set(target, key, value, receiver)
    }
  }
}
Vue的模板最终都会编译成render函数, render函数调用的时候, 将this通过call绑定为了instance.proxy, 看如下代码
function setupRenderEffect(instance, initialVNode, container) {
  function componentUpdateFn() {
    if (!instance.isMounted) {
      const proxyToUse = instance.proxy;
      // 可在 render 函数中通过 this 来使用 proxy
      const subTree = (instance.subTree = normalizeVNode(
        instance.render.call(proxyToUse, proxyToUse)
      ));
    } else {
      const proxyToUse = instance.proxy;
      const nextTree = normalizeVNode(
        instance.render.call(proxyToUse, proxyToUse)
      );
    }
  }
}
所以, 在Vue的模板中, 不需要使用xxx.value来取值, 同时模板中的响应式变量也能取到对应的值
# Options API
Vue3中可以关闭对optionsAPI写法的支持, 如果我们只使用 Composition Api 那么就可以通过构建工具(webpack/rollup) 设置静态变量注入的方式关闭此特性。然后交由 Tree-Shacking 删除无用的代码,从而减少引用代码包的体积
// packages/runtime-core/src/component.ts
export function finishComponentSetup(
  instance: ComponentInternalInstance,
  isSSR: boolean,
  skipOptions?: boolean
) {
  const Component = instance.type as ComponentOptions
  // support for 2.x options
  if (__FEATURE_OPTIONS_API__ && !(__COMPAT__ && skipOptions)) {
    setCurrentInstance(instance)
    pauseTracking()
    applyOptions(instance)
    resetTracking()
    unsetCurrentInstance()
  }
}

// webpack.config.js
const { DefinePlugin } = require('webpack');
module.exports = {
  plugins: [
    new DefinePlugin({
      __FEATURE_OPTIONS_API__: JSON.stringify(false)
    })
  ]
}

// rollup.js
import replace from '@rollup/plugin-replace';
export default {
  plugins: [
    replace({
      __FEATURE_OPTIONS_API__: JSON.stringify(false)
    })
  ]
};
# 位运算
在源码中判断组件的类型时使用了大量的位运算。 鉴于此, 本段落来总结前端的位运算
# 运算符
&(与): 两个位都为 1 时,结果才为 1|(或): 两个位都为 0 时,结果才为 0^(异或): 两个位相同为 0 ,相异为 1( 任意数x^0为x, 任意数自身异或x^x为0)~(按位取反): 所有 0 变 1,1 变 0<<(左移): 各二进位全部左移若干位,高位丢弃,低位补 0(等于乘以 2 的若干次幂)>>(右移): 各二进位全部右移若干位,对无符号数,高位补 0 ,有符号数,各编译器处理方法不一样,有的补符号位,有的补 0 (等于除以 2 的若干次幂并向下取整)
# 权限管理
位运算最经典的使用场景就是权限组合了
// 0b表示二进制数字, 下面箭头符号后的值是已补0的完整二进制位
const READ = 1 << 0 // 0b1 -> 0001
const WRITE = 1 << 1 // 0b10 -> 0010
const UPDATE = 1 << 2 // 0b100 -> 0100
const DELETE = 1 << 3 // 0b1000 -> 1000

/* 用法一 使用位运算组合权限, 或运算=>有一个1就为真 */
// 1.可读可写
const ALLOW_READ_WRITE = READ | WRITE // 0b11 -> 0011
// 2.可读可写可更新
const ALLOW_READ_WRITE_UPDATE = READ | WRITE | UPDATE // 0b111 -> 0111
// 3.可读可写可更新可删除
const ALLOW_READ_WRITE_UPDATE_DELETE = READ | WRITE | UPDATE | DELETE // 0b1111 -> 1111

/* 用法二 使用位运算判断是否具备某权限, 与运算=>两个都是1才为真 */
// 1.判断是否具备读权限
const ALLOW_READ = (READ & ALLOW_READ_WRITE_UPDATE_DELETE) === READ // 0b1 -> 0001
// 2.判断是否具备写权限
const ALLOW_WRITE = (WRITE & ALLOW_READ_WRITE_UPDATE_DELETE) === WRITE // 0b10 -> 0010
// 3.判断是否具备更新权限
const ALLOW_UPDATE = (UPDATE & ALLOW_READ_WRITE_UPDATE_DELETE) === UPDATE // 0b100 -> 0100
// 4.判断是否具备删除权限
const ALLOW_DELETE = (DELETE & ALLOW_READ_WRITE_UPDATE_DELETE) === DELETE // 0b1000 -> 1000

/* 用法三 使用位运算来删除某个权限, 异或运算=>相异为真, ~为按位取反 */
// 1.删除读权限
const REMOVE_READ = ALLOW_READ_WRITE_UPDATE_DELETE ^ READ // 0b1110 -> 1110
const REMOTE_READ_2 = ALLOW_READ_WRITE_UPDATE_DELETE & ~READ // 0b1110 -> 1110
// 2.删除写权限
const REMOVE_WRITE = ALLOW_READ_WRITE_UPDATE_DELETE ^ WRITE // 0b1101 -> 1101
const REMOTE_WRITE_2 = ALLOW_READ_WRITE_UPDATE_DELETE & ~WRITE // 0b1101 -> 1101
// 3.删除更新权限
const REMOVE_UPDATE = ALLOW_READ_WRITE_UPDATE_DELETE ^ UPDATE // 0b1011 -> 1011
const REMOTE_UPDATE_2 = ALLOW_READ_WRITE_UPDATE_DELETE & ~UPDATE // 0b1011 -> 1011
// 4.删除删除权限
const REMOVE_DELETE = ALLOW_READ_WRITE_UPDATE_DELETE ^ DELETE // 0b0111 -> 0111
const REMOTE_DELETE_2 = ALLOW_READ_WRITE_UPDATE_DELETE & ~DELETE // 0b0111 -> 0111
# 源码的应用
Vue3源码中, 主要使用位运算定义和判断组件实例的类型, 截取一段源码如下:
// packages/shared/src/shapeFlags.ts
export const enum ShapeFlags {
  ELEMENT = 1,
  FUNCTIONAL_COMPONENT = 1 << 1,
  STATEFUL_COMPONENT = 1 << 2,
  TEXT_CHILDREN = 1 << 3,
  ARRAY_CHILDREN = 1 << 4,
  SLOTS_CHILDREN = 1 << 5,
  TELEPORT = 1 << 6,
  SUSPENSE = 1 << 7,
  COMPONENT_SHOULD_KEEP_ALIVE = 1 << 8,
  COMPONENT_KEPT_ALIVE = 1 << 9,
  COMPONENT = ShapeFlags.STATEFUL_COMPONENT | ShapeFlags.FUNCTIONAL_COMPONENT
}

// packages/runtime-core/src/renderer.ts
const patch: PatchFn = (...) => {
    const { type, ref, shapeFlag } = n2
    switch (type) {
      default:
        if (shapeFlag & ShapeFlags.ELEMENT) {
          processElement(...)
        } else if (shapeFlag & ShapeFlags.COMPONENT) {
          processComponent(...)
        } else if (shapeFlag & ShapeFlags.TELEPORT) {
          ;(type as typeof TeleportImpl).process(...)
        } else if (__FEATURE_SUSPENSE__ && shapeFlag & ShapeFlags.SUSPENSE) {
          ;(type as typeof SuspenseImpl).process(...)
        }
    }
  }
# setup 、 render 、 template
当应用中, 采用runtime + compile 的 Vue 版本, 即vue.esm-browser(.prod).js 或者 vue.global(.prod).js的前提下。
此时, 在一个组件选项中, 既写了setup且返回为函数, 又写了render选项属性, 还写了template模版, 谁的优先级更高呢?
<script src="https://unpkg.com/vue@3/dist/vue.global.js"></script>
<div id="app">
  <div>template: {{ message }}</div>
</div>
<script>
  const { createApp, h } = Vue
  createApp({
    data() {
      return {
        message: 'template msg',
        message2: 'render msg',
      }
    },
    setup() {
      const message1 = 'setup msg'
      return () => h('div', message1)
    },
    render() {
      return h('div', this.message2)
    }
  }).mount('#app')
</script>
优先级从高到底, 依次为 setup > render > template, 源码逻辑 (opens new window)如下:
// packages/runtime-core/src/component.ts
export function finishComponentSetup(
  instance: ComponentInternalInstance,
  isSSR: boolean,
  skipOptions?: boolean
) {
  const Component = instance.type as ComponentOptions

  // template / render function normalization
  // could be already set when returned from setup()
  if (!instance.render) {
    // only do on-the-fly compile if not in SSR - SSR on-the-fly compilation
    // is done by server-renderer
    if (!isSSR && compile && !Component.render) {
      const template =
        (__COMPAT__ &&
          instance.vnode.props &&
          instance.vnode.props['inline-template']) ||
        Component.template ||
        resolveMergedOptions(instance).template
      if (template) {
        if (__DEV__) {
          startMeasure(instance, `compile`)
        }
        const { isCustomElement, compilerOptions } = instance.appContext.config
        const { delimiters, compilerOptions: componentCompilerOptions } =
          Component
        const finalCompilerOptions: CompilerOptions = extend(
          extend(
            {
              isCustomElement,
              delimiters
            },
            compilerOptions
          ),
          componentCompilerOptions
        )
        if (__COMPAT__) {
          // pass runtime compat config into the compiler
          finalCompilerOptions.compatConfig = Object.create(globalCompatConfig)
          if (Component.compatConfig) {
            // @ts-expect-error types are not compatible
            extend(finalCompilerOptions.compatConfig, Component.compatConfig)
          }
        }
        Component.render = compile(template, finalCompilerOptions)
        if (__DEV__) {
          endMeasure(instance, `compile`)
        }
      }
    }

    instance.render = (Component.render || NOOP) as InternalRenderFunction

    // for runtime-compiled render functions using `with` blocks, the render
    // proxy used needs a different `has` handler which is more performant and
    // also only allows a whitelist of globals to fallthrough.
    if (installWithProxy) {
      installWithProxy(instance)
    }
  }
}
# 响应式原理
# reactive
代码中使用reactive函数包装原来的对象后, 就会设置对应的get和set陷阱函数
读取代理响应式对象的值时, 除了返回原对象中的值, 还会触发track依赖收集
设置代理响应式对象的值时, 除了改变原对象中的值, 还会触发trigger依赖更新
const get = /*#__PURE__*/ createGetter()
const set = /*#__PURE__*/ createSetter()

// packages/reactivity/src/baseHandlers.ts
function createGetter(isReadonly = false, shallow = false) {
  return function get(target: Target, key: string | symbol, receiver: object) {
    const res = Reflect.get(target, key, receiver)
    if (!isReadonly) {
      track(target, TrackOpTypes.GET, key)
    }
    return res
  }
}

function createSetter(shallow = false) {
  return function set(
    target: object,
    key: string | symbol,
    value: unknown,
    receiver: object
  ): boolean {
    let oldValue = (target as any)[key]
    if (isReadonly(oldValue) && isRef(oldValue) && !isRef(value)) {
      return false
    }
    const result = Reflect.set(target, key, value, receiver)
    // don't trigger if target is something up in the prototype chain of original
    if (target === toRaw(receiver)) {
      if (!hadKey) {
        trigger(target, TriggerOpTypes.ADD, key, value)
      } else if (hasChanged(value, oldValue)) {
        trigger(target, TriggerOpTypes.SET, key, value, oldValue)
      }
    }
    return result
  }
}

export const mutableHandlers: ProxyHandler<object> = {
  get,
  set
}

function createReactiveObject(
  target: Target,
  isReadonly: boolean,
  baseHandlers: ProxyHandler<any>,
  collectionHandlers: ProxyHandler<any>,
  proxyMap: WeakMap<Target, any>
) {
  const proxy = new Proxy(
    target,
    targetType === TargetType.COLLECTION ? collectionHandlers : baseHandlers
  )
  proxyMap.set(target, proxy)
  return proxy
}

export function reactive(target: object) {
  // if trying to observe a readonly proxy, return the readonly version.
  if (isReadonly(target)) {
    return target
  }
  return createReactiveObject(
    target,
    false,
    mutableHandlers,
    mutableCollectionHandlers,
    reactiveMap
  )
}
# mountComponent
在首次组件挂载的过程中, 会调用setupRenderEffect函数
// packages/runtime-core/src/renderer.ts
const mountComponent: MountComponentFn = (
  initialVNode,
  container,
  anchor,
  parentComponent,
  parentSuspense,
  isSVG,
  optimized
) => {
  // 处理响应式更新的主要逻辑
  setupRenderEffect(
    instance,
    initialVNode,
    container,
    anchor,
    parentSuspense,
    isSVG,
    optimized
  )
}
# setupRenderEffect
首先会创建一个组件更新的通用函数componentUpdateFn, 接着创建一个ReactiveEffect实例, 用于存储这整个组件的更新队列
// packages/runtime-core/src/renderer.ts
const setupRenderEffect: SetupRenderEffectFn = (
  instance,
  initialVNode,
  container,
  anchor,
  parentSuspense,
  isSVG,
  optimized
) => {
  const componentUpdateFn = () => {
    if (!instance.isMounted) {
      let vnodeHook: VNodeHook | null | undefined
      const { el, props } = initialVNode
      const { bm, m, parent } = instance
      const isAsyncWrapperVNode = isAsyncWrapper(initialVNode)

      // beforeMount hook
      if (bm) {
        invokeArrayFns(bm)
      }
      // onVnodeBeforeMount
      if (
        !isAsyncWrapperVNode &&
        (vnodeHook = props && props.onVnodeBeforeMount)
      ) {
        invokeVNodeHook(vnodeHook, parent, initialVNode)
      }
      if (
        __COMPAT__ &&
        isCompatEnabled(DeprecationTypes.INSTANCE_EVENT_HOOKS, instance)
      ) {
        instance.emit('hook:beforeMount')
      }
      toggleRecurse(instance, true)

      patch(
        null,
        subTree,
        container,
        anchor,
        instance,
        parentSuspense,
        isSVG
      )
      initialVNode.el = subTree.el

      if (
        __COMPAT__ &&
        isCompatEnabled(DeprecationTypes.INSTANCE_EVENT_HOOKS, instance)
      ) {
        queuePostRenderEffect(
          () => instance.emit('hook:mounted'),
          parentSuspense
        )
      }
      instance.isMounted = true
      // #2458: deference mount-only object parameters to prevent memleaks
      initialVNode = container = anchor = null as any
    } else {
      // updateComponent
      // This is triggered by mutation of component's own state (next: null)
      // OR parent calling processComponent (next: VNode)
      let { next, bu, u, parent, vnode } = instance
      let originNext = next
      let vnodeHook: VNodeHook | null | undefined
      // beforeUpdate hook
      if (bu) {
        invokeArrayFns(bu)
      }
      // onVnodeBeforeUpdate
      if ((vnodeHook = next.props && next.props.onVnodeBeforeUpdate)) {
        invokeVNodeHook(vnodeHook, parent, next, vnode)
      }
      if (
        __COMPAT__ &&
        isCompatEnabled(DeprecationTypes.INSTANCE_EVENT_HOOKS, instance)
      ) {
        instance.emit('hook:beforeUpdate')
      }
      toggleRecurse(instance, true)

      const nextTree = renderComponentRoot(instance)
      const prevTree = instance.subTree
      instance.subTree = nextTree
      patch(
        prevTree,
        nextTree,
        // parent may have changed if it's in a teleport
        hostParentNode(prevTree.el!)!,
        // anchor may have changed if it's in a fragment
        getNextHostNode(prevTree),
        instance,
        parentSuspense,
        isSVG
      )
      next.el = nextTree.el
    }
  }

  // create reactive effect for rendering
  const effect = (instance.effect = new ReactiveEffect(
    componentUpdateFn,
    () => queueJob(update),
    instance.scope // track it in component's effect scope
  ))

  const update: SchedulerJob = (instance.update = () => effect.run())
  update.id = instance.uid
  update()
}
可见ReactiveEffect中通过构造函数实例化的过程中, 会保存该组件更新函数componentUpdateFn, 成为实例属性fn, 接着通过update()执行effect中的run, 也就是执行了componentUpdateFn, 用于启动首次的依赖收集
# ReactiveEffect
// packages/reactivity/src/effect.ts
export class ReactiveEffect<T = any> {
  active = true
  deps: Dep[] = []
  parent: ReactiveEffect | undefined = undefined

  constructor(
    public fn: () => T,
    public scheduler: EffectScheduler | null = null,
    scope?: EffectScope
  ) {
    recordEffectScope(this, scope)
  }

  run() {
    if (!this.active) {
      return this.fn()
    }
    try {
      this.parent = activeEffect
      activeEffect = this
      shouldTrack = true

      return this.fn()
    }
  }
}
执行effect.run的过程中, 通过全局变量activeEffect来临时引用了当前组件的effect
当componentUpdateFn执行的过程中, 一定会访问响应式变量, 因此就会触发Reactive中设置的get陷阱函数, 因此调用了get函数中的track,
触发依赖收集
# track依赖收集
track函数中, 会缓存reactive(target)中的原对象targe到全局targetMap, target作为key, 值为depsMap提升性能
然后, 缓存target中的当前访问的key到depsMap中, 值为一个Set列表, 这个Set中就存储每个activeEffect, 也就是上一步的ReactiveEffect实例effect对象
export function track(target: object, type: TrackOpTypes, key: unknown) {
  if (shouldTrack && activeEffect) {
    let depsMap = targetMap.get(target)
    if (!depsMap) {
      targetMap.set(target, (depsMap = new Map()))
    }
    let dep = depsMap.get(key)
    if (!dep) {
      depsMap.set(key, (dep = createDep()))
    }

    const eventInfo = __DEV__
      ? { effect: activeEffect, target, type, key }
      : undefined

    trackEffects(dep, eventInfo)
  }
}

export function trackEffects(
  dep: Dep,
  debuggerEventExtraInfo?: DebuggerEventExtraInfo
) {
  let shouldTrack = false
  if (effectTrackDepth <= maxMarkerBits) {
    if (!newTracked(dep)) {
      dep.n |= trackOpBit // set newly tracked
      shouldTrack = !wasTracked(dep)
    }
  } else {
    // Full cleanup mode.
    shouldTrack = !dep.has(activeEffect!)
  }

  if (shouldTrack) {
    dep.add(activeEffect!)
    activeEffect!.deps.push(dep)
  }
}
# trigger依赖更新
如果, 修改响应式变量的值, 例如const v = reactive({ a: 1 }); v.a = 2;就会触发响应式对象的set陷阱函数, 当中又会触发
trigger函数, 通过targetMap->depsMap->deps找到key对应的deps列表
然后依次执行deps中的每个effect.run, 也就是上文的componentUpdateFn, 从而完成了整个响应式数据的逻辑
// packages/reactivity/src/effect.ts
export function trigger(
  target: object,
  type: TriggerOpTypes,
  key?: unknown,
  newValue?: unknown,
  oldValue?: unknown,
  oldTarget?: Map<unknown, unknown> | Set<unknown>
) {
  const depsMap = targetMap.get(target)
  if (!depsMap) {
    // never been tracked
    return
  }
  triggerEffects(createDep(effects))
}

export function triggerEffects(
  dep: Dep | ReactiveEffect[],
  debuggerEventExtraInfo?: DebuggerEventExtraInfo
) {
  // spread into array for stabilization
  const effects = isArray(dep) ? dep : [...dep]
  for (const effect of effects) {
    if (effect.computed) {
      triggerEffect(effect, debuggerEventExtraInfo)
    }
  }
  for (const effect of effects) {
    if (!effect.computed) {
      triggerEffect(effect, debuggerEventExtraInfo)
    }
  }
}

function triggerEffect(
  effect: ReactiveEffect,
  debuggerEventExtraInfo?: DebuggerEventExtraInfo
) {
  if (effect !== activeEffect || effect.allowRecurse) {
    if (effect.scheduler) {
      effect.scheduler()
    } else {
      effect.run()
    }
  }
}
# toRef 、 toRefs
可以将值、refs 或 getters 规范化为 refs
也可以基于响应式对象上的一个属性,创建一个对应的 ref。这样创建的 ref 与其源属性保持同步:改变源属性的值将更新 ref 的值,反之亦然。
使用场景是, 当我们需要将响应式对象中的某个属性单独拿出来使用时, 为了保持原有的响应式。 可以使用toRef将其转换为ref类型, 这样就可以直接使用ref的值了
// packages/reactivity/src/ref.ts
export function toRefs<T extends object>(object: T): ToRefs<T> {
  if (__DEV__ && !isProxy(object)) {
    console.warn(`toRefs() expects a reactive object but received a plain one.`)
  }
  const ret: any = isArray(object) ? new Array(object.length) : {}
  for (const key in object) {
    ret[key] = toRef(object, key)
  }
  return ret
}

class ObjectRefImpl<T extends object, K extends keyof T> {
  public readonly __v_isRef = true

  constructor(
    private readonly _object: T,
    private readonly _key: K,
    private readonly _defaultValue?: T[K]
  ) {}

  get value() {
    const val = this._object[this._key]
    return val === undefined ? (this._defaultValue as T[K]) : val
  }

  set value(newVal) {
    this._object[this._key] = newVal
  }

  get dep(): Dep | undefined {
    return getDepFromReactive(toRaw(this._object), this._key)
  }
}

export function toRef<T extends object, K extends keyof T>(
  object: T,
  key: K,
  defaultValue?: T[K]
): ToRef<T[K]> {
  const val = object[key]
  return isRef(val)
    ? val
    : (new ObjectRefImpl(object, key, defaultValue) as any)
}
# PatchProps
Vue3源码中, PatchProps用于更新组件的属性, 相较于新旧属性值, 主要分为以下三种情况
- 场景一 前面有属性, 后面没有属性, 属于删除
- 场景二 前后都有属性值, 后面的值不一样了, 属于修改
- 场景三 前面有属性, 后面变为null或者undefined, 属于删除
以下是源码中的实现
const patchProps = (
    el: RendererElement,
    vnode: VNode,
    oldProps: Data,
    newProps: Data,
    parentComponent: ComponentInternalInstance | null,
    parentSuspense: SuspenseBoundary | null,
    isSVG: boolean
  ) => {
    if (oldProps !== newProps) {
      if (oldProps !== EMPTY_OBJ) {

        // 场景一. 前面有属性, 后面没有属性, 属于删除
        for (const key in oldProps) {
          if (!isReservedProp(key) && !(key in newProps)) {
            hostPatchProp(
              el,
              key,
              oldProps[key],
              null,
              isSVG,
              vnode.children as VNode[],
              parentComponent,
              parentSuspense,
              unmountChildren
            )
          }
        }
      }
       // 场景二 前后都有属性值, 后面的值不一样了, 属于修改
      for (const key in newProps) {
        // empty string is not valid prop
        if (isReservedProp(key)) continue
        const next = newProps[key]
        const prev = oldProps[key]
        // defer patching value
        if (next !== prev && key !== 'value') {
          hostPatchProp(
            el,
            key,
            prev,
            next,
            isSVG,
            vnode.children as VNode[],
            parentComponent,
            parentSuspense,
            unmountChildren
          )
        }
      }
      if ('value' in newProps) {
        hostPatchProp(el, 'value', oldProps.value, newProps.value)
      }
    }
  }
# PatchChildren
在源码中, 更新普通子元素的流程中, PatchChildren对比了普通子元素的新旧子节点, 然后再进行更新
# 场景分类
新节点和旧节点可以是文本节点, 也可以是数组子节点, 两两组合总共以下几种场景
- 场景一: 老节点是数组节点, 新节点是文本节点
源码逻辑
将老节点的子节点全部删除, 然后将新节点的文本节点插入到容器中
- 场景二: 老节点是文本节点, 新节点也是文本节点
源码逻辑
直接修改文本节点的内容
- 场景三: 老节点是文本节点, 新节点是数组节点
源码逻辑
清空老节点的文本节点, 然后把新节点的数组节点mount到容器中
- 场景四: 老节点是数组节点, 新节点也是数组节点
源码逻辑
通过diff算法对比新老节点, 然后更新, 也是最复杂的最核心的场景
以下是源码实现
const patchChildren: PatchChildrenFn = (
    n1,
    n2,
    container,
    anchor,
    parentComponent,
    parentSuspense,
    isSVG,
    slotScopeIds,
    optimized = false
  ) => {
    const c1 = n1 && n1.children
    const prevShapeFlag = n1 ? n1.shapeFlag : 0
    const c2 = n2.children

    const { patchFlag, shapeFlag } = n2
    // fast path
    if (patchFlag > 0) {
      if (patchFlag & PatchFlags.KEYED_FRAGMENT) {
        // this could be either fully-keyed or mixed (some keyed some not)
        // presence of patchFlag means children are guaranteed to be arrays
        patchKeyedChildren(
          c1 as VNode[],
          c2 as VNodeArrayChildren,
          container,
          anchor,
          parentComponent,
          parentSuspense,
          isSVG,
          slotScopeIds,
          optimized
        )
        return
      } else if (patchFlag & PatchFlags.UNKEYED_FRAGMENT) {
        // unkeyed
        patchUnkeyedChildren(
          c1 as VNode[],
          c2 as VNodeArrayChildren,
          container,
          anchor,
          parentComponent,
          parentSuspense,
          isSVG,
          slotScopeIds,
          optimized
        )
        return
      }
    }

    // children has 3 possibilities: text, array or no children.
    if (shapeFlag & ShapeFlags.TEXT_CHILDREN) {
      // text children fast path
      /**
       * 场景一: 老节点是数组节点, 新节点是文本节点
       * 操作步骤: 将老节点的子节点全部删除, 然后将新节点的文本节点插入到容器中
       */
      if (prevShapeFlag & ShapeFlags.ARRAY_CHILDREN) {
        unmountChildren(c1 as VNode[], parentComponent, parentSuspense)
      }
      /**
       * 场景二: 老节点是文本节点, 新节点也是文本节点
       * 操作步骤: 直接修改文本节点的内容
       */
      if (c2 !== c1) {
        hostSetElementText(container, c2 as string)
      }
    } else {
       /**
       * 场景四: 老节点是数组节点, 新节点也是数组节点
       * 操作步骤: 通过diff算法对比新老节点, 然后更新, 也是最复杂的最核心的场景
       */
      if (prevShapeFlag & ShapeFlags.ARRAY_CHILDREN) {
        // prev children was array
        if (shapeFlag & ShapeFlags.ARRAY_CHILDREN) {
          // two arrays, cannot assume anything, do full diff
          patchKeyedChildren(
            c1 as VNode[],
            c2 as VNodeArrayChildren,
            container,
            anchor,
            parentComponent,
            parentSuspense,
            isSVG,
            slotScopeIds,
            optimized
          )
        } else {
          // no new children, just unmount old
          unmountChildren(c1 as VNode[], parentComponent, parentSuspense, true)
        }
      } else {
        /**
         * 场景三: 老节点是文本节点, 新节点是数组节点
         * 操作步骤: 清空老节点的文本节点, 然后把新节点的数组节点mount到容器中
         */
        // prev children was text OR null
        // new children is array OR null
        if (prevShapeFlag & ShapeFlags.TEXT_CHILDREN) {
          hostSetElementText(container, '')
        }
        // mount new if array
        if (shapeFlag & ShapeFlags.ARRAY_CHILDREN) {
          mountChildren(
            c2 as VNodeArrayChildren,
            container,
            anchor,
            parentComponent,
            parentSuspense,
            isSVG,
            slotScopeIds,
            optimized
          )
        }
      }
    }
  }
# 双端对比DIFF算法
在patchKeyedChildren的场景四中, 使用双端对比的diff算法, 对比新老节点, 再进行更新
在前端领域中的虚拟节点diff算法中, 都是基于三条假设的前提, 将两颗虚拟节点树简化为对同一层级的节点进行比较, 从而来降低复杂度
三条假设
- DOM节点跨层级移动场景少, 可忽略不计
- 拥有相同类的两个组件生成相似的树形结构
- 拥有不同类的两个组件生成不同的树形结构
先来看看源码中的实现, 源码中使用了双端三个指针来进行对比, 分别是i左侧头指针, e1老节点尾指针, e2新节点尾指针
  const patchKeyedChildren = (
    c1: VNode[],
    c2: VNodeArrayChildren,
    container: RendererElement,
    parentAnchor: RendererNode | null,
    parentComponent: ComponentInternalInstance | null,
    parentSuspense: SuspenseBoundary | null,
    isSVG: boolean,
    slotScopeIds: string[] | null,
    optimized: boolean
  ) => {
    let i = 0
    const l2 = c2.length
    let e1 = c1.length - 1 // prev ending index
    let e2 = l2 - 1 // next ending index

    // 1. sync from start
    // (a b) c
    // (a b) d e

    // case1: 从左侧开始对比, 用于锁定范围
    while (i <= e1 && i <= e2) {
      const n1 = c1[i]
      const n2 = (c2[i] = optimized
        ? cloneIfMounted(c2[i] as VNode)
        : normalizeVNode(c2[i]))
      if (isSameVNodeType(n1, n2)) {
        patch(
          n1,
          n2,
          container,
          null,
          parentComponent,
          parentSuspense,
          isSVG,
          slotScopeIds,
          optimized
        )
      } else {
        break
      }
      i++
    }

    // 2. sync from end
    // a (b c)
    // d e (b c)

    // case2: 从右侧开始对比, 用于锁定范围
    while (i <= e1 && i <= e2) {
      const n1 = c1[e1]
      const n2 = (c2[e2] = optimized
        ? cloneIfMounted(c2[e2] as VNode)
        : normalizeVNode(c2[e2]))
      if (isSameVNodeType(n1, n2)) {
        patch(
          n1,
          n2,
          container,
          null,
          parentComponent,
          parentSuspense,
          isSVG,
          slotScopeIds,
          optimized
        )
      } else {
        break
      }
      e1--
      e2--
    }

    // 3. common sequence + mount
    // (a b)
    // (a b) c
    // i = 2, e1 = 1, e2 = 2
    // (a b)
    // c (a b)
    // i = 0, e1 = -1, e2 = 0

    // case3: 新节点比老节点长, 需要创建, 包含了右侧和左侧对比
    if (i > e1) {
      if (i <= e2) {
        const nextPos = e2 + 1
        const anchor = nextPos < l2 ? (c2[nextPos] as VNode).el : parentAnchor
        while (i <= e2) {
          patch(
            null,
            (c2[i] = optimized
              ? cloneIfMounted(c2[i] as VNode)
              : normalizeVNode(c2[i])),
            container,
            anchor,
            parentComponent,
            parentSuspense,
            isSVG,
            slotScopeIds,
            optimized
          )
          i++
        }
      }
    }

    // 4. common sequence + unmount
    // (a b) c
    // (a b)
    // i = 2, e1 = 2, e2 = 1
    // a (b c)
    // (b c)
    // i = 0, e1 = 0, e2 = -1

    // case4: 老节点比新节点长, 需要删除, 包含了右侧和左侧对比
    else if (i > e2) {
      while (i <= e1) {
        unmount(c1[i], parentComponent, parentSuspense, true)
        i++
      }
    }

    // 5. unknown sequence
    // [i ... e1 + 1]: a b [c d e] f g
    // [i ... e2 + 1]: a b [e d c h] f g
    // i = 2, e1 = 4, e2 = 5
    // case5: 中间对比的情况, 需要从双端一起对比
    else {
      const s1 = i // prev starting index
      const s2 = i // next starting index

      // 5.1 build key:index map for newChildren
      const keyToNewIndexMap: Map<string | number | symbol, number> = new Map()
      for (i = s2; i <= e2; i++) {
        const nextChild = (c2[i] = optimized
          ? cloneIfMounted(c2[i] as VNode)
          : normalizeVNode(c2[i]))
        if (nextChild.key != null) {
          if (__DEV__ && keyToNewIndexMap.has(nextChild.key)) {
            warn(
              `Duplicate keys found during update:`,
              JSON.stringify(nextChild.key),
              `Make sure keys are unique.`
            )
          }
          keyToNewIndexMap.set(nextChild.key, i)
        }
      }

      // 5.2 loop through old children left to be patched and try to patch
      // matching nodes & remove nodes that are no longer present
      let j
      let patched = 0
      const toBePatched = e2 - s2 + 1
      let moved = false
      // used to track whether any node has moved
      let maxNewIndexSoFar = 0
      // works as Map<newIndex, oldIndex>
      // Note that oldIndex is offset by +1
      // and oldIndex = 0 is a special value indicating the new node has
      // no corresponding old node.
      // used for determining longest stable subsequence
      const newIndexToOldIndexMap = new Array(toBePatched)
      for (i = 0; i < toBePatched; i++) newIndexToOldIndexMap[i] = 0

      for (i = s1; i <= e1; i++) {
        const prevChild = c1[i]
        if (patched >= toBePatched) {
          // all new children have been patched so this can only be a removal
          unmount(prevChild, parentComponent, parentSuspense, true)
          continue
        }
        let newIndex
        if (prevChild.key != null) {
          newIndex = keyToNewIndexMap.get(prevChild.key)
        } else {
          // key-less node, try to locate a key-less node of the same type
          for (j = s2; j <= e2; j++) {
            if (
              newIndexToOldIndexMap[j - s2] === 0 &&
              isSameVNodeType(prevChild, c2[j] as VNode)
            ) {
              newIndex = j
              break
            }
          }
        }
        if (newIndex === undefined) {
          unmount(prevChild, parentComponent, parentSuspense, true)
        } else {
          newIndexToOldIndexMap[newIndex - s2] = i + 1
          if (newIndex >= maxNewIndexSoFar) {
            maxNewIndexSoFar = newIndex
          } else {
            moved = true
          }
          patch(
            prevChild,
            c2[newIndex] as VNode,
            container,
            null,
            parentComponent,
            parentSuspense,
            isSVG,
            slotScopeIds,
            optimized
          )
          patched++
        }
      }

      // 5.3 move and mount
      // generate longest stable subsequence only when nodes have moved
      const increasingNewIndexSequence = moved
        ? getSequence(newIndexToOldIndexMap)
        : EMPTY_ARR
      j = increasingNewIndexSequence.length - 1
      // looping backwards so that we can use last patched node as anchor
      for (i = toBePatched - 1; i >= 0; i--) {
        const nextIndex = s2 + i
        const nextChild = c2[nextIndex] as VNode
        const anchor =
          nextIndex + 1 < l2 ? (c2[nextIndex + 1] as VNode).el : parentAnchor
        if (newIndexToOldIndexMap[i] === 0) {
          // mount new
          patch(
            null,
            nextChild,
            container,
            anchor,
            parentComponent,
            parentSuspense,
            isSVG,
            slotScopeIds,
            optimized
          )
        } else if (moved) {
          // move if:
          // There is no stable subsequence (e.g. a reverse)
          // OR current node is not among the stable sequence
          if (j < 0 || i !== increasingNewIndexSequence[j]) {
            move(nextChild, container, anchor, MoveType.REORDER)
          } else {
            j--
          }
        }
      }
    }
  }
从源码中可以得知, 双端对比diff算法主要分为了以下几种情况
# 从左侧开始对比
如下图, 从左侧开始对比的情况, 也就是i指针, 从左侧开始, 依次对比新老节点, 直到不一致的节点为止。 示例中老节点是a b c, 新节点是a b d e

源码中的实现
// 1. sync from start
// (a b) c
// (a b) d e

// case1: 从左侧开始对比, 用于锁定范围
while (i <= e1 && i <= e2) {
  const n1 = c1[i]
  const n2 = (c2[i] = optimized
    ? cloneIfMounted(c2[i] as VNode)
    : normalizeVNode(c2[i]))
  if (isSameVNodeType(n1, n2)) {
    patch(
      n1,
      n2,
      container,
      null,
      parentComponent,
      parentSuspense,
      isSVG,
      slotScopeIds,
      optimized
    )
  } else {
    break
  }
  i++
}
# 从右侧开始对比
如下图, 从右侧开始对比的情况, 也就是e1和e2指针, 从右侧开始, 依次对比新老节点, 直到不一致的节点为止。 示例中老节点是a b c, 新节点是d e b c

源码中的实现
// 2. sync from end
// a (b c)
// d e (b c)

// case2: 从右侧开始对比, 用于锁定范围
while (i <= e1 && i <= e2) {
  const n1 = c1[e1]
  const n2 = (c2[e2] = optimized
    ? cloneIfMounted(c2[e2] as VNode)
    : normalizeVNode(c2[e2]))
  if (isSameVNodeType(n1, n2)) {
    patch(
      n1,
      n2,
      container,
      null,
      parentComponent,
      parentSuspense,
      isSVG,
      slotScopeIds,
      optimized
    )
  } else {
    break
  }
  e1--
  e2--
}
# 新节点比老节点长
进入这一步的时候, 已经进行了左侧对比或者右侧对比, 这一步新节点比老节点长, 最终都是需要创建节点的, 然后添加到左侧或者右侧
源码中的指针, 也就是i或者e1和e2指针已经移动到了不一致的节点上
- 征对左侧对比: 示例中老节点是
a b, 新节点是a b c

- 征对右侧对比: 示例中老节点是
a b, 新节点是c a b

右侧的对比中, 假设如果有多个元素e d c a b, 添加顺序是从i=0开始到i=2结束, 先添加e a b, 再添加e d a b, 最后添加e d c a b
这两种创建的场景, 在源码中使用了一个判断完成
// 3. common sequence + mount
// (a b)
// (a b) c
// i = 2, e1 = 1, e2 = 2
// (a b)
// c (a b)
// i = 0, e1 = -1, e2 = 0

// case3: 新节点比老节点长, 需要创建, 包含了右侧和左侧对比
if (i > e1) {
  if (i <= e2) {
    const nextPos = e2 + 1
    const anchor = nextPos < l2 ? (c2[nextPos] as VNode).el : parentAnchor
    while (i <= e2) {
      patch(
        null,
        (c2[i] = optimized
          ? cloneIfMounted(c2[i] as VNode)
          : normalizeVNode(c2[i])),
        container,
        anchor,
        parentComponent,
        parentSuspense,
        isSVG,
        slotScopeIds,
        optimized
      )
      i++
    }
  }
}
# 老节点比新节点长
该场景下, 主要是删除操作, 将老节点中多余的节点删除
- 征对左侧对比: 示例中老节点是
a b c, 新节点是a b

- 征对右侧对比: 示例中老节点是
a b c, 新节点是b c

跟上一个case的场景一样, 源码中这两种场景进入的是一个判断
// 4. common sequence + unmount
// (a b) c
// (a b)
// i = 2, e1 = 2, e2 = 1
// a (b c)
// (b c)
// i = 0, e1 = 0, e2 = -1

// case4: 老节点比新节点长, 需要删除, 包含了右侧和左侧对比
else if (i > e2) {
  while (i <= e1) {
    unmount(c1[i], parentComponent, parentSuspense, true)
    i++
  }
}
# 中间对比
最后到了中间对比阶段, 这个阶段是整个diff算法中最复杂的板块, 也是最核心的, 这个阶段需要从双端一起对比, 也就是i和e1和e2指针一起移动, 直到找到相同的节点, 然后进行更新

从上图看到, 中间对比也非常复杂, 场景分为以下三种:
# Ⅰ、中间对比之删除场景
在老的节点中存在, 但在新的节点中不存在的节点, 需要被删除。
示例中, 使用的老节点是a, b, (c, d), f, g, 新节点是a, b, (e, c), f, g
删除场景优化点
新节点中所有需要对比的节点已经遍历完成, 那么老节点中多出来的节点不再需要对比,直接删除即可
源码中, 首先遍历新旧节点中不一样的片段, 然后创建一个Map映射-keyToNewIndexMap, 作用是在遍历老节点的过程中, 可以快速查找到该老节点是否存在于新节点中, 如果存在则继续进行递归patch对比更新, 如果不存在则直接进行删除
为了考虑边界场景, 如果老节点中, 节点没有设置key属性值, 那么只能再次遍历新节点片段来逐一对比
而上述的删除场景优化点, 代码中是使用了两个变量来统计数量, patched用来计算已patch对比的节点数量, toBePatched用来计算新节点中总共需要被patch的数量, 老节点中多出来的节点数量, 就是toBePatched - patched, 此时多出来的节点直接删除即可
相应的代码逻辑如下:
const s1 = i // prev starting index
const s2 = i // next starting index

// 5.1 build key:index map for newChildren
const keyToNewIndexMap: Map<string | number | symbol, number> = new Map()
for (i = s2; i <= e2; i++) {
  const nextChild = (c2[i] = optimized
    ? cloneIfMounted(c2[i] as VNode)
    : normalizeVNode(c2[i]))
  if (nextChild.key != null) {
    if (__DEV__ && keyToNewIndexMap.has(nextChild.key)) {
      warn(
        `Duplicate keys found during update:`,
        JSON.stringify(nextChild.key),
        `Make sure keys are unique.`
      )
    }
    keyToNewIndexMap.set(nextChild.key, i)
  }
}

// 5.2 loop through old children left to be patched and try to patch
// matching nodes & remove nodes that are no longer present
let j
let patched = 0
const toBePatched = e2 - s2 + 1
let moved = false
// used to track whether any node has moved
let maxNewIndexSoFar = 0
// works as Map<newIndex, oldIndex>
// Note that oldIndex is offset by +1
// and oldIndex = 0 is a special value indicating the new node has
// no corresponding old node.
// used for determining longest stable subsequence
const newIndexToOldIndexMap = new Array(toBePatched)
for (i = 0; i < toBePatched; i++) newIndexToOldIndexMap[i] = 0

for (i = s1; i <= e1; i++) {
  const prevChild = c1[i]
  if (patched >= toBePatched) {
    // all new children have been patched so this can only be a removal
    unmount(prevChild, parentComponent, parentSuspense, true)
    continue
  }
  let newIndex
  if (prevChild.key != null) {
    newIndex = keyToNewIndexMap.get(prevChild.key)
  } else {
    // key-less node, try to locate a key-less node of the same type
    for (j = s2; j <= e2; j++) {
      if (
        newIndexToOldIndexMap[j - s2] === 0 &&
        isSameVNodeType(prevChild, c2[j] as VNode)
      ) {
        newIndex = j
        break
      }
    }
  }
  if (newIndex === undefined) {
    unmount(prevChild, parentComponent, parentSuspense, true)
  } else {
    newIndexToOldIndexMap[newIndex - s2] = i + 1
    if (newIndex >= maxNewIndexSoFar) {
      maxNewIndexSoFar = newIndex
    } else {
      moved = true
    }
    patch(
      prevChild,
      c2[newIndex] as VNode,
      container,
      null,
      parentComponent,
      parentSuspense,
      isSVG,
      slotScopeIds,
      optimized
    )
    patched++
  }
}
# Ⅱ、中间对比之移动场景
对于新旧节点中, 只是顺序发生了变化, 但是节点本身是相同的, 那么就是移动场景, 需要将节点移动到正确的位置。在这种场景下,Vue3源码中使用了最长递增子序列算法来进行优化
先贴源码, 逐步分析
  // used to track whether any node has moved
  /**
   * case5.3场景优化, 因为每次都计算最长递增子序列是需要复杂度的, 所以这里使用一个变量来标记是否需要计算最长递增子序列
   * 当老节点在新节点数组中的下标是稳定递增的时候, 不需要计算最长递增子序列
   * 一旦出现一个小于前面下标的情况, 就需要计算最长递增子序列
   */
  let moved = false
  let maxNewIndexSoFar = 0


  // works as Map<newIndex, oldIndex>
  // Note that oldIndex is offset by +1
  // and oldIndex = 0 is a special value indicating the new node has
  // no corresponding old node.
  // used for determining longest stable subsequence
  /**
   * 优化case5.3逻辑
   * 初始化新老下标的映射关系, 下标为在新节点中的下标位置(减去起始位置), 值为在老节点中的下标位置
   * Note that oldIndex is offset by +1
   * and oldIndex = 0 is a special value indicating the new node has
   * 老节点下标为0是一个在新节点中的特殊值, 因此需要加上一个偏移+1
   *
   */
  const newIndexToOldIndexMap = new Array(toBePatched)
  for (i = 0; i < toBePatched; i++) newIndexToOldIndexMap[i] = 0

  for (i = s1; i <= e1; i++) {
    // 省略case5.1和5.2逻辑 ....
    if (newIndex === undefined) {
      unmount(prevChild, parentComponent, parentSuspense, true)
    } else {
      /**
       * e.g. 如果老节点是a, b, (c, d, e), f, g  新节点是a, b, (e, c, d), f, g
       * 因为老节点中的元素下标可能为0, 因此存入IndexToOldIndexMap时得增加偏移量1
       *     那么他们的映射关系为:
       *     - c对应的newIndexToOldIndexMap下标为1, 值为2
       *     - d对应的newIndexToOldIndexMap下标为2, 值为3
       *     - e对应的newIndexToOldIndexMap下标为0, 值为4
       *     结果为: [4, 2, 3], 每个值偏移了1, 因此为[5, 3, 4]
       */
      newIndexToOldIndexMap[newIndex - s2] = i + 1
      if (newIndex >= maxNewIndexSoFar) {
        maxNewIndexSoFar = newIndex
      } else {
        moved = true
      }
    }
  }

  // 5.3 move and mount
  // generate longest stable subsequence only when nodes have moved
  /**
   * case5.3: 老节点在新节点中仍然存在, 但是位置变化了
   * 操作步骤: 获取最长递增子序列, 遍历需要移动的位置, 然后进行移动
   */
  const increasingNewIndexSequence = moved
    ? getSequence(newIndexToOldIndexMap)
    : EMPTY_ARR
  j = increasingNewIndexSequence.length - 1
  // looping backwards so that we can use last patched node as anchor
  // 遍历新节点差异区间, 为了保证insertBefore插入的基本元素的稳定性, 因此需要倒序遍历
  for (i = toBePatched - 1; i >= 0; i--) {
    const nextIndex = s2 + i
    const nextChild = c2[nextIndex] as VNode
    const anchor =
      nextIndex + 1 < l2 ? (c2[nextIndex + 1] as VNode).el : parentAnchor
    if (newIndexToOldIndexMap[i] === 0) {
      // mount new
      patch(
        null,
        nextChild,
        container,
        anchor,
        parentComponent,
        parentSuspense,
        isSVG,
        slotScopeIds,
        optimized
      )
    } else if (moved) {
      // move if:
      // There is no stable subsequence (e.g. a reverse)
      // OR current node is not among the stable sequence
      if (j < 0 || i !== increasingNewIndexSequence[j]) {
        move(nextChild, container, anchor, MoveType.REORDER)
      } else {
        j--
      }
    }
  }
# Ⅲ、中间对比之创建场景
创建场景下, 只需要在遍历新节点差异区间的过程中, 使用新老节点位置映射newIndexToOldIndexMap[i] === 0来判断是否需要创建节点即可
如果值为0, 表示老节点中不存在, 因此需要创建。源码逻辑如下
for (i = toBePatched - 1; i >= 0; i--) {
  const nextIndex = s2 + i
  const nextChild = c2[nextIndex] as VNode
  const anchor =
    nextIndex + 1 < l2 ? (c2[nextIndex + 1] as VNode).el : parentAnchor
  /**
   * case5.4: 在老节点在新节点中不存在, 但在新节点中存在
   * 操作步骤: 创建新的节点
   */
  if (newIndexToOldIndexMap[i] === 0) {
    // mount new
    patch(
      null,
      nextChild,
      container,
      anchor,
      parentComponent,
      parentSuspense,
      isSVG,
      slotScopeIds,
      optimized
    )
  } else if (moved) {
    /**
     * case5.3: 老节点在新节点中仍然存在, 但是位置变化了
     * 操作步骤: 获取最长递增子序列, 遍历需要移动的位置, 然后进行移动
     */
    // move if:
    // There is no stable subsequence (e.g. a reverse)
    // OR current node is not among the stable sequence
    if (j < 0 || i !== increasingNewIndexSequence[j]) {
      move(nextChild, container, anchor, MoveType.REORDER)
    } else {
      j--
    }
  }
}
# 最长递增子序列算法
最长递增子序列概念
在给定的数值序列中, 找到一个子序列, 使得这个子序列元素的数值依次递增, 并且这个子序列的长度尽可能的大
假设, 我们现在有一个这样两组节点
老节点: 1, 2, 3, 4, 5, 6
新节点: 1, 3, 2, 4, 6, 5
// 我们根据新节点生成递增子序列(非最长)(注意: 也并不是唯一的), 其结果为:
非最长: 1, 3, 6
最长: 1, 2, 4, 6
最长: 1, 2, 4, 5
非最长: 1, 2, 6
非最长: 1, 2, 5
最长: 1, 3, 4, 6
最长: 1, 3, 4, 5
最长递增子序列算法实现:
首先有一个原数组
O, 和一个记录最长递增子序列的数组R,R中第一项可以设置为O的第一项然后, 首先遍历原数组
O, 当遍历的数字O[I]大于记录数组R的最后一项数字R[R.length - 1]时, 直接添加到末尾否则, 遍历记录数组
R, 在R中找到第一个大于O[I]的数字R[J], 然后将R[J]替换为O[I]最终, 返回这个记录数组
R, 就是最长递增子序列数组
作者自己在自己demos仓库实现了一个最长递增子序列算法的基本代码示例 (opens new window)
Vue3源码中, 使用了一个getSequence函数来获取最长递增子序列的下标, 该函数的实现如下
如果想看该段算法的更详细的解析, 可以参考以下文章
// packages/runtime-core/src/renderer.ts
// https://en.wikipedia.org/wiki/Longest_increasing_subsequence

function getSequence(arr: number[]): number[] {
  // 获取一个数组的浅拷贝, p的元素改变不影响原数组arr
  // p是一个最终的回溯数组, 它会在最终的result回溯中被使用
  // 它会在每次result发生变化时, 记录result更新前最后一个索引的值
  const p = arr.slice()
  // 定义返回值(最长递增子序列下标), 因为下标从0开始, 所以它的初始值为0
  const result = [0]
  // i为当前数组下标
  // j为递增序列结果数组result的末尾元素(该值也是arr原数组中元素的下标)
  // u为result数组的起始下标
  // v为result数组的末尾下标
  // c 为result数组中间元素的下标
  let i, j, u, v, c
  // 当前数组长度
  const len = arr.length
  for (i = 0; i < len; i++) {
    const arrI = arr[i]
    if (arrI !== 0) {
      j = result[result.length - 1]
      if (arr[j] < arrI) {
        p[i] = j
        result.push(i)
        continue
      }

      // 二分查找
      // 因为第一步中, 当前值比result数组最后一项的下标所对应的值小了, 所以需要重新处理result中的值
      // 通过二分查找, 快速找到result下标数组中, 比当前值大的第一个元素的下标
      u = 0
      v = result.length - 1
      while (u < v) {
        // c为中间元素的下标
        c = (u + v) >> 1
        // 如果查找跟中间值比, 如果比中间值大, 则将起始指针u指向中间值的下一个元素
        if (arr[result[c]] < arrI) {
          u = c + 1
        } else {
          // 因为要查找的元素比中间值小, 所以将末尾指针v指向中间值
          v = c
        }
      }

      // 经过上一步二分查找, 已经找到了result下标数组中, 比当前值大的第一个元素的下标
      // 当前元素比最长递增下标数组的最后一个元素所对应的元素小, 因此需要替换下标数组的最后一个下标
      // result[u]就是找到的result元素中, 比当前值大的第一个元素的下标, 通过arr[result[u]]获取原始元素
      if (arrI < arr[result[u]]) {
        if (u > 0) {
          p[i] = result[u - 1]
        }
        // 更新最新的result数组中的元素下标
        result[u] = i
      }
    }
  }
  // 到此位置, 最长递增子序列长度是正确的, 但是顺序不一定正确, 因此需要回溯
  u = result.length
  v = result[u - 1]
  while (u-- > 0) {
    result[u] = v
    v = p[v]
  }
  return result
}
特别需要注意的是, 最后一小段代码, 也就是回溯的部分。
为什么需要这一部分呢?是因为使用二分查找替换掉元素之后, 只能保证最长递增子序列的长度是正确的, 但是元素顺序不一定正确, 因此才需要回溯
在回溯的过程中, 借助了一个与原数组长度一样的数组,来缓存比当前位置小的那个位置的索引,如p[i]存的永远是比arr[i]小的那个值所在的位置
在每次给result下标数组入新下标或者需要替换元素的时候, 都来修改p数组的同一位置, 将这个位置存入上一个比当前值小的值的下标, 当最后的时候, 就形成了一个升序绑定关系, 最后倒序遍历result数组中的下标, 去p中反向找到前面一个元素, 循环往复, 就形成了一个顺序正确的最长递增子序列
此处可以借助一个图来理解回溯
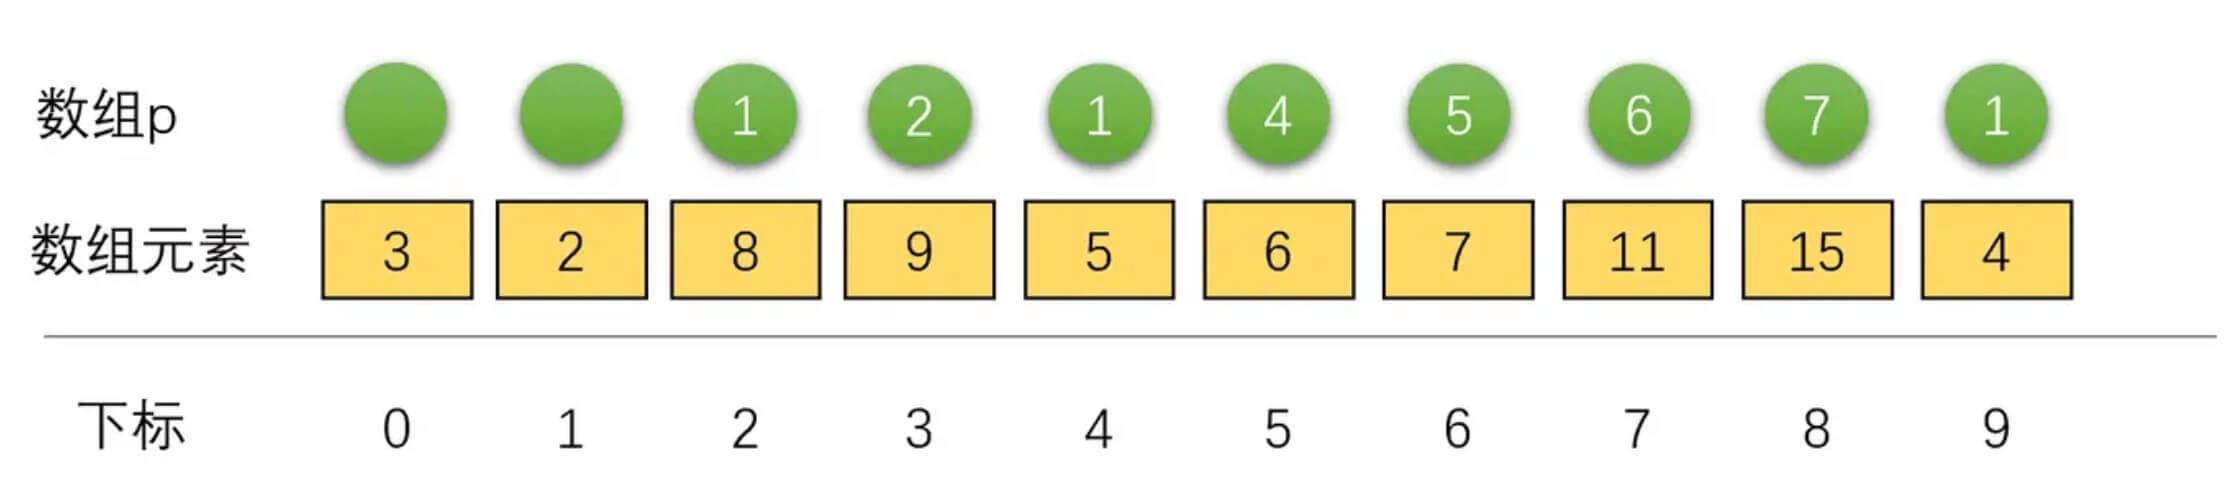
如图所示, 回溯前, result数组结果为[1, 9, 5, 6, 7, 8], 9此时不应该出现在第二个位置, 因此顺序不正确
因为在遍历过程中, 就已经绑定了升序关系, 因此直接从图上反序遍历result, 从最后一项的下标8依次往前找, 找到数值为15的元素, 然后在p中找到前一个下标是7, 依次完成后, 得到值数组[2, 5, 6, 7, 11, 15], 对应的下标数组为[1, 4, 5, 6, 7, 8]
# 模版解析
Vue3中进行template解析使用的是有限状态机, 也就是FSM。FSM是一种抽象的机器模型, 有限个状态及在这些状态之间的转移和动作等组成, 用来描述对象在其一生中所经历的各种状态及其转移条件
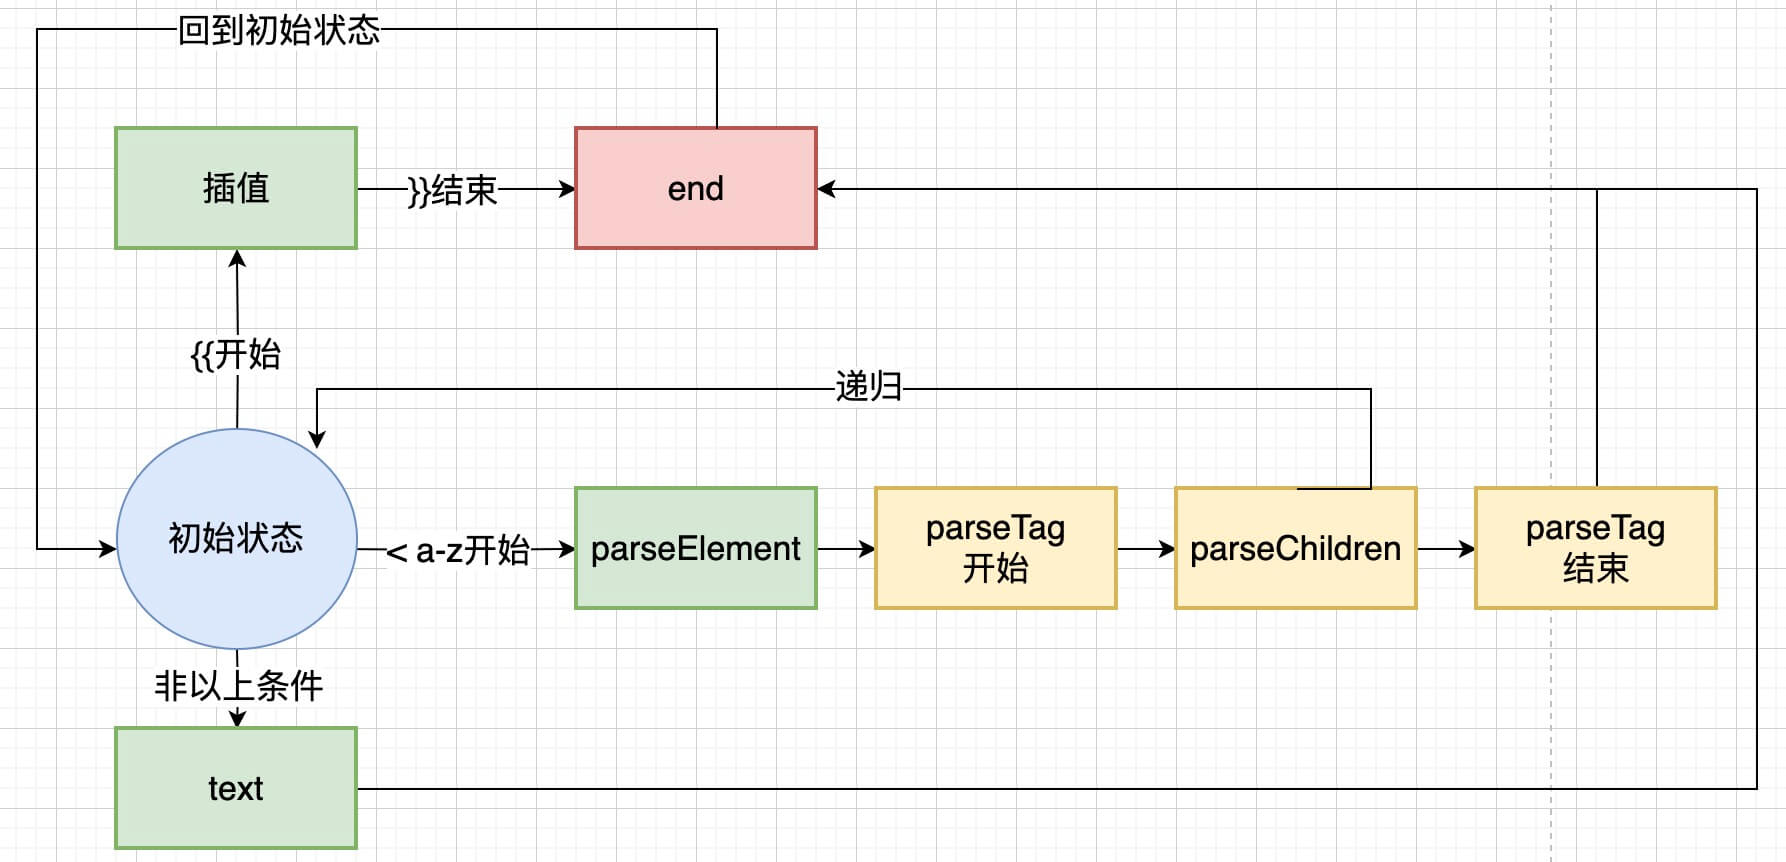
而解析模版是有一套专门的规范, 也就是HTML解析规范 (opens new window), 该规范中定义了HTML中的各种标签, 以及标签的属性, 以及标签的嵌套关系等等。